Ble蓝牙App(五)数据操作
前言
关于低功耗蓝牙的服务、特性、属性、描述符都已经讲清楚了,而下面就是使用这些知识进行数据的读取、写入、通知等操作。
正文
首先要做的就是根据操作内容进行相应的处理,目前常见的操作有Read、Write、Write no response、Notify和Indicate。
一、操作内容处理
首先要修改MainActivity中的onPropertyOperate()函数,
    override fun onPropertyOperate(characteristic: BluetoothGattCharacteristic, operateName: String) {
        if (!bleCore.isConnected()) showMsg("设备已断开连接")
        when (operateName) {
            READ -> {}
            WRITE, WRITE_NO_RESPONSE -> {}
            NOTIFY, INDICATE -> {}
            BROADCAST, AUTHENTICATED_SIGNED_WRITES, EXTENDED_PROPERTIES -> showMsg(operateName)
        }
}这里着重看刚才提到的5个操作,在操作之前我们最好判断一下当前是否处于连接中,在BleCore中增加isConnected()函数,代码如下所示:
fun isConnected() = mIsConnected二、读取数据
① 概念
在BLE(Bluetooth Low Energy)通信中,Ble Read(读操作)是一种用于从BLE服务器设备读取数据的操作。
当一个BLE设备(称为客户端)需要获取另一个BLE设备(称为服务器)上的数据时,可以使用Ble Read操作。客户端向服务器发送读取请求,并等待服务器返回所请求的数据。
Ble Read操作具有以下特点:
- 请求-回复模式:Ble Read操作是一种请求-回复模式的操作,客户端向服务器发送读取请求,服务器则回复所请求的数据。这种模式保证了数据传输的可靠性和顺序性。
- 单次数据传输:Ble Read操作一次只能读取一个数据值或一个数据块。如果需要读取多个数据值,客户端需要连续发送多个读取请求。
- 数据的访问权限:Ble Read操作只能读取具有权限允许的数据。服务器可以设定数据的访问权限,例如只允许读取、只允许写入、或者读写均允许。
需要注意的是,Read操作可能会引入一定的延迟,因为客户端需要等待服务器的响应。此外,Read操作的成功取决于服务器是否支持读取请求,并且客户端是否具有读取权限。
② 实操
当特性拥有Read的属性时,我们就可以读取特性的value,在的BleCore的BleGattCallback中,重写onCharacteristicRead()函数,代码如下所示:
        /**
         * 读取特性回调 Android 13及以上使用
         */
        override fun onCharacteristicRead(gatt: BluetoothGatt, characteristic: BluetoothGattCharacteristic, value: ByteArray, status: Int) {
            if (status != BluetoothGatt.GATT_SUCCESS) return
            deviceInfo("读取特性值(Android 13及以上):${BleUtils.bytesToHex(value, true)}")
        }

        /**
         * 读取特性回调 Android 12及以下使用
         */
        @Deprecated("Deprecated in Java")
        override fun onCharacteristicRead(gatt: BluetoothGatt, characteristic: BluetoothGattCharacteristic, status: Int) {
            if (status != BluetoothGatt.GATT_SUCCESS) return
            deviceInfo("读取特性值(Android 12及以下):${BleUtils.bytesToHex(characteristic.value, true)}")
}bytesToHex()是将byte[]转成Hex的函数,还有hexToBytes的函数,我们在BleUtils中增加这两个函数,代码如下所示:
    /**
     * byte[] to hex
     * @param isAdd 是否添加 0x 头
     */
    fun bytesToHex(byteArray: ByteArray, isAdd: Boolean = false): String {
        val hexChars = "0123456789ABCDEF"
        val hexString = StringBuilder()
        for (byte in byteArray) {
            val value = byte.toInt() and 0xFF
            val firstIndex = value shr 4 and 0x0F
            val secondIndex = value and 0x0F
            hexString.append(hexChars[firstIndex])
            hexString.append(hexChars[secondIndex])
        }
        return (if (isAdd) "0x" else "" ) + hexString.toString()
    }

    /**
     * hex to byte[]
     */
    fun hexToBytes(hexString: String): ByteArray {
        val cleanHexString = hexString.replace("\s".toRegex(), "")
        val byteArray = ByteArray(cleanHexString.length / 2)
        for (i in byteArray.indices) {
            val index = i * 2
            val byteString = cleanHexString.substring(index, index + 2)
            val byteValue = byteString.toInt(16).toByte()
            byteArray[i] = byteValue
        }
        return byteArray
} 读取特性之后如果状态正常,我们就显示一下读取的内容,当我们调用Gatt的readCharacteristic()函数时就会触发这个回调。下面在BleCore中增加readCharacteristic()函数,代码如下所示:
    fun readCharacteristic(characteristic: BluetoothGattCharacteristic) {
        deviceInfo("读取特性: ${BleUtils.getShortUUID(characteristic.uuid)}")
        mGatt?.readCharacteristic(characteristic)
}然后修改onPropertyOperate()函数,代码如下所示:
override fun onPropertyOperate(characteristic: BluetoothGattCharacteristic, operateName: String) {
when (operateName) {
READ -> bleCore.readCharacteristic(characteristic)
...
}
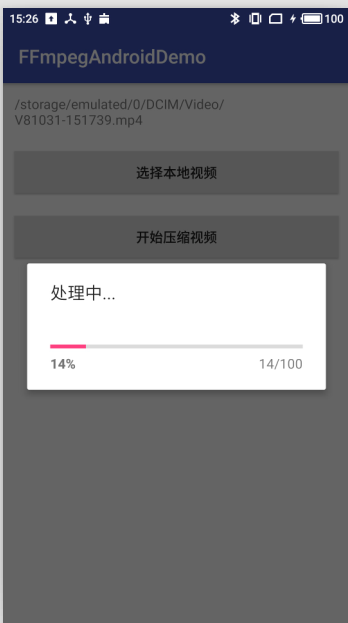
}下面我们运行一下:

三、写入数据
读取数据写好了,下面我们来看写入数据,写入数据要看写入的方式,有Write和Wirte No Response,我们先了解这两种方式的区别:
① 概念
在BLE通信中,有两种常用的写操作方式:Ble Write(带回复的写操作)和Write No Response(无回复的写操作)。
- Ble Write(带回复的写操作):当一个BLE设备(称为客户端)想要向另一个BLE设备(称为服务器)发送数据时,可以使用Ble Write操作。客户端向服务器发送数据并等待服务器发送确认回复(Acknowledgment)来表示数据已经被成功接收。这种写操作是一种可靠的方式,确保数据传输的可靠性。
- Write No Response(无回复的写操作):在某些情况下,客户端发送的数据并不需要服务器的确认回复,或者在时间上要求更加紧凑的传输。这时可以使用Write No Response操作。客户端向服务器发送数据后,并不会等待服务器的确认回复。这种写操作通常用于实时传输等不需要确认的数据,以减少通信延迟和增加通信吞吐量。
需要注意的是,Write No Response操作在数据传输过程中不提供任何保障机制,例如数据的可靠性、顺序性或幂等性等。因此,使用Write No Response操作时需要确保应用场景的需求和通信的可靠性。
② 实操
写入数据需要有一个输入框,因此我就写了一个弹窗来进行操作,首先写弹窗布局,在layout下新建一个dialog_write_data.xml,代码如下所示:
<?xml version="1.0" encoding="utf-8"?>
<androidx.constraintlayout.widget.ConstraintLayout xmlns:android="http://schemas.android.com/apk/res/android"
    xmlns:app="http://schemas.android.com/apk/res-auto"
    style="@style/Widget.MaterialComponents.TextInputLayout.OutlinedBox"
    android:layout_width="match_parent"
    android:layout_height="wrap_content"
    android:background="@color/white">

    <com.google.android.material.appbar.MaterialToolbar
        android:id="@+id/toolbar"
        android:layout_width="match_parent"
        android:layout_height="?attr/actionBarSize"
        app:layout_constraintEnd_toEndOf="parent"
        app:layout_constraintStart_toStartOf="parent"
        app:layout_constraintTop_toTopOf="parent"
        app:title="写入数据" />

    <com.google.android.material.textfield.TextInputLayout
        android:id="@+id/data_layout"
        style="@style/Widget.MaterialComponents.TextInputLayout.OutlinedBox"
        android:layout_width="match_parent"
        android:layout_height="wrap_content"
        android:layout_marginStart="16dp"
        android:layout_marginEnd="16dp"
        app:boxStrokeColor="@color/black"
        app:layout_constraintEnd_toEndOf="parent"
        app:layout_constraintStart_toStartOf="parent"
        app:layout_constraintTop_toBottomOf="@+id/toolbar"
        app:prefixText="0x">

        <com.google.android.material.textfield.TextInputEditText
            android:id="@+id/et_data"
            android:layout_width="match_parent"
            android:layout_height="wrap_content"
            android:hint="HEX数据"
            android:inputType="text|textCapCharacters"
            android:lines="1"
            android:singleLine="true" />
    </com.google.android.material.textfield.TextInputLayout>

    <Button
        android:id="@+id/btn_negative"
        android:layout_width="wrap_content"
        android:layout_height="wrap_content"
        android:layout_marginEnd="18dp"
        android:layout_weight="1"
        android:text="取消"
        app:layout_constraintEnd_toStartOf="@+id/btn_positive"
        app:layout_constraintTop_toTopOf="@+id/btn_positive" />

    <Button
        android:id="@+id/btn_positive"
        android:layout_width="wrap_content"
        android:layout_height="wrap_content"
        android:layout_marginTop="16dp"
        android:layout_marginBottom="16dp"
        android:layout_weight="1"
        android:text="发送"
        app:layout_constraintBottom_toBottomOf="parent"
        app:layout_constraintEnd_toEndOf="@+id/data_layout"
        app:layout_constraintTop_toBottomOf="@+id/data_layout" />

</androidx.constraintlayout.widget.ConstraintLayout>
布局内容比较简单,只需要一个输入框两个按钮即可,下面我们在MainActivity中写一个函数来加载这个布局xml显示弹窗,代码如下所示:
    /**
     * 显示写入数据弹窗
     */
    private fun showWriteDataDialog(characteristic: BluetoothGattCharacteristic, operateName: String) {
        val dialog = BottomSheetDialog(this, R.style.BottomSheetDialogStyle)
        val writeDataBinding = DialogWriteDataBinding.inflate(layoutInflater)
        writeDataBinding.toolbar.title = if (operateName == WRITE) "写入数据" else "写入无需响应数据"
        writeDataBinding.btnPositive.setOnClickListener {
            val inputData = writeDataBinding.etData.text.toString()
            if (inputData.isEmpty()) {
                writeDataBinding.dataLayout.error = "请输入数据"
                return@setOnClickListener
            }
            if (!BleUtils.isHexFormat(inputData)) {
                writeDataBinding.dataLayout.error = "请输入有效数据"
                return@setOnClickListener
            }
            bleCore.writeCharacteristic(characteristic, inputData, operateName)
            dialog.dismiss()
        }
        writeDataBinding.btnNegative.setOnClickListener {
            dialog.dismiss()
        }
        dialog.setContentView(writeDataBinding.root)
        dialog.show()
    }
在弹窗中,根据传入的操作名判断要以什么方式写入数据,同时对写入的数据进行了格式校验,在BleUtils中增加函数,代码如下所示:
fun isHexFormat(str: String) = Regex("^([\dA-Fa-f]{2})+$").matches(str) 当检查数据无误之后我们就可以写入数据了,调用bleCore.writeCharacteristic(characteristic, inputData, operateName),在BleCore中增加这个函数,代码如下所示:
    /**
     * 写入特性
     * @param characteristic 特性
     * @param data Hex数据
     * @param operateName 操作名,决定写入的是 Write 还是 Write No Response
     */
    fun writeCharacteristic(characteristic: BluetoothGattCharacteristic, data: String, operateName: String) {
        deviceInfo("写入特性:${BleUtils.getShortUUID(characteristic.uuid)},value:0x$data")
        //写入类型
        val writeType = if (operateName == BleConstant.WRITE) BluetoothGattCharacteristic.WRITE_TYPE_DEFAULT else BluetoothGattCharacteristic.WRITE_TYPE_NO_RESPONSE
        //写入数据
        val byteArray = BleUtils.hexToBytes(data)
        //根据Android版本进行不同的写入方式 Android 13及以上和以下不同
        val executionResult = if (isAndroid13()) {
            mGatt?.writeCharacteristic(characteristic, byteArray, writeType) == BluetoothStatusCodes.SUCCESS
        } else {
            characteristic.writeType = writeType
            characteristic.value = byteArray
            mGatt?.writeCharacteristic(characteristic)
        }
        //执行写入动作成功不代表写入数据成功,执行写入动作失败,写入数据一定失败
        deviceInfo(if (executionResult == true)  "执行写入动作成功" else "执行写入动作失败")
} 这个函数相对的内容多一些,首先是根据操作名得到写入的类型,然后获取写入的数据,再根据Android的版本去写入数据,最终调用Gatt的writeCharacteristic()函数进行写入,写入属于一个执行动作,有失败的可能性,可以根据返回值进行判断,Android13以前返回的是Boolean,Android13及以上返回的是Int,这里要注意一下。执行之后如果成功了,则会触发GattCallback的onCharacteristicWrite()回调,下面在BleGattCallback中重写这个函数,代码如下所示:
        override fun onCharacteristicWrite(gatt: BluetoothGatt, characteristic: BluetoothGattCharacteristic, status: Int) {
            if (status != BluetoothGatt.GATT_SUCCESS) return
            if (BleUtils.isAndroid13()) {
                gatt.readCharacteristic(characteristic)
            } else {
                deviceInfo("写入成功:${BleUtils.bytesToHex(characteristic.value)}")
            }
        }
这个函数中,如果是Android 13及以上版本,写入回调中的value是null,需要通过readCharacteristic()函数去获取写入的值,但是要确保这个特性有Read属性,否则读取不了,这个地方也是我觉得不合理得地方,也有可能是我没找到对应得方式吧。最后我们修改MainActivity中的onPropertyOperate()函数中的代码,如下所示:
    override fun onPropertyOperate(characteristic: BluetoothGattCharacteristic, operateName: String) {
        when (operateName) {
            WRITE, WRITE_NO_RESPONSE -> showWriteDataDialog(characteristic, operateName)
            ...
        }
} 最后我们再修复一个bug,没错,前面写的时候这个bug忽略掉了,那就是在CharacteristicAdapter的onBindViewHolder()函数中,之前在这里对属性的点击进行了回调,当时是传进去一个特性,和一个操作名称,如图所示
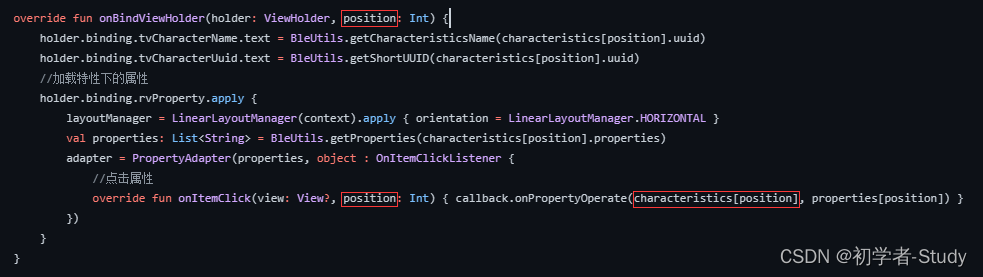
这里通过position获取到特性,而这里的position是属性适配器,而我们要的是特性适配器的position,这样做的问题就在于使用的时候如果只有一个属性的话,那么无论有几个特性,position都是0,也是在调试中发现的这个问题,改完之后代码如下所示:
    override fun onBindViewHolder(holder: ViewHolder, position: Int) {
        val characteristic = characteristics[position]
        val characteristicName = BleUtils.getCharacteristicsName(characteristic.uuid)
        holder.binding.tvCharacterName.text = characteristicName
        holder.binding.tvCharacterUuid.text = if (characteristicName != UNKNOWN_CHARACTERISTICS) BleUtils.getShortUUID(characteristic.uuid) else characteristic.uuid.toString()
        //加载特性下的属性
        holder.binding.rvProperty.apply {
            layoutManager = LinearLayoutManager(context).apply { orientation = LinearLayoutManager.HORIZONTAL }
            val properties: List = BleUtils.getProperties(characteristic.properties)
            adapter = PropertyAdapter(properties, object : OnItemClickListener {
                //点击属性
                override fun onItemClick(view: View?, position: Int) { callback.onPropertyOperate(characteristic, properties[position]) }
            })
        }
        //加载特性下的描述
        if (characteristic.descriptors.isEmpty()) {
            holder.binding.layDescriptors.visibility = View.GONE
            return
        }
        holder.binding.rvDescriptor.apply {
            layoutManager = LinearLayoutManager(context)
            adapter = DescriptorAdapter(characteristic.descriptors)
        }
}为了方便查看动作,我们在修改一下BleCore中的deviceInfo()函数代码,加一个日志打印,代码如下所示:
        private fun deviceInfo(info: String) {
            Log.d(TAG, "deviceInfo: $info")
            mBleCallback?.deviceInfo(info)
        }
下面运行一下:
日志如下所示:

四、打开通知
实际上打开通知的意义就是能够收到蓝牙设备返回的数据,先了解以下相关的概念知识。
一、概念
Ble Enable Notify是指在蓝牙低功耗(BLE)通信中使能通知功能的操作。当设备之间建立了蓝牙连接后,设备可以通过特征(Characteristic)来交换数据。通知(Notification)是一种特征的属性,允许一个设备向另一个设备发送数据,而不需要另一个设备主动请求。
当一个设备使能了通知功能(Enable Notify),它就可以向另一个设备发送通知,另一个设备只需要注册监听这个特征的通知即可接收到数据。这样可以实现数据的异步传输,一旦数据发生变化,发送方会自动发出通知,接收方就可以及时获取到最新的数据。在BLE开发中,通常需要通过操作特征的属性来使能或禁用通知功能。
二、实操
下面我们来实际操作一下,首先在BleCore中增加一个函数,代码如下所示:
    /**
     * 开启或者关闭通知
     * @param characteristic 特性
     * @param descriptorUuid 描述UUID
     * @param operateName 操作名, 决定通过那种方式开启通知
     */
    fun notifyEnable(characteristic: BluetoothGattCharacteristic, descriptorUuid: UUID, operateName: String) {
        //设置特性通知,这一点很重要
        if (mGatt?.setCharacteristicNotification(characteristic,true) == false) return
        //描述
        val descriptor = characteristic.getDescriptor(descriptorUuid)
        //写入描述值
        val value = if (!mIsEnabled) {
            if (operateName == BleConstant.INDICATE) BluetoothGattDescriptor.ENABLE_INDICATION_VALUE else BluetoothGattDescriptor.ENABLE_NOTIFICATION_VALUE
        } else {
            BluetoothGattDescriptor.DISABLE_NOTIFICATION_VALUE
        }
        val executionResult = if (isAndroid13()) {
            mGatt?.writeDescriptor(descriptor, value) == BluetoothStatusCodes.SUCCESS
        } else {
            descriptor.value = value
            mGatt?.writeDescriptor(descriptor)
        }
        deviceInfo((if (executionResult == true)  "执行启用动作成功" else "执行启用动作失败") + ",value: ${BleUtils.bytesToHex(value, true)}" )
} 因为当前的项目环境是基于Android13,所在在蓝牙的一些API处理上,我们都要考虑兼容的问题,我觉得奇怪的是,为什么不在Android12的版本中顺便加上去这些改动的API,也不重要,开发者就是这个命,这里的代码实际上比较简单,就是根据操作名进行enable的方式,通过一个变量mIsEnabled来决定你是打开通知还是关闭通知,这个变量我们定义在companion object中,代码如下所示:
    companion object {
        ...
        /**
         * 是否开启通知
         */
        private var mIsEnabled = false
} 调用writeDescriptor()会触发描述符写入回调,在BleGattCallback中增加这个回调,代码如下所示:
        /**
         * 描述符写入回调
         */
        override fun onDescriptorWrite(gatt: BluetoothGatt, descriptor: BluetoothGattDescriptor, status: Int) {
            if (status != BluetoothGatt.GATT_SUCCESS) return
            if (BleUtils.isAndroid13()) {
                gatt.readDescriptor(descriptor) //读取描述符
            } else {
                mIsEnabled = !descriptor.value.contentEquals(BluetoothGattDescriptor.DISABLE_NOTIFICATION_VALUE)
                deviceInfo("写入描述符成功:${BleUtils.bytesToHex(descriptor.value, true)}")
            }
        }
在回调中,处理mIsEnabled的赋值,因为在Android 13中没有办法直接获取描述符结果,而是需要通过readDescriptor()函数获取,使用这个函数,则会触发另一个回调函数,同样是在BleGattCallback中增加这个回调,代码如下所示:
        /**
         * 读取描述符回调 Android 13及以上使用
         */
        override fun onDescriptorRead(gatt: BluetoothGatt, descriptor: BluetoothGattDescriptor, status: Int, value: ByteArray) {
            if (status != BluetoothGatt.GATT_SUCCESS) return
            mIsEnabled = !value.contentEquals(BluetoothGattDescriptor.DISABLE_NOTIFICATION_VALUE)
            deviceInfo("读取描述符成功(Android 13及以上使用):${BleUtils.bytesToHex(value, true)}")
        }

        /**
         * 读取描述符回调 Android 12及以上下使用
         */
        @Deprecated("Deprecated in Java")
        override fun onDescriptorRead(gatt: BluetoothGatt, descriptor: BluetoothGattDescriptor, status: Int) {
            if (status != BluetoothGatt.GATT_SUCCESS) return
            mIsEnabled = !descriptor.value.contentEquals(BluetoothGattDescriptor.DISABLE_NOTIFICATION_VALUE)
            deviceInfo("读取描述符成功(Android 12及以下使用):${BleUtils.bytesToHex(descriptor.value, true)}")
} 关于mIsEnabled的参数我们还需要修改一下一个地方,那就是在连接设备之后如果发现mIsEnabled 为true,我们改成false。
    fun connect(device: BluetoothDevice) {
        deviceInfo("连接中...")
        if (mIsEnabled) mIsEnabled = false
        ...
}然后我们再修改一下MainActivity中的onPropertyOperate()函数,代码如下所示:
    /**
     * 属性操作
     */
    override fun onPropertyOperate(characteristic: BluetoothGattCharacteristic, operateName: String) {
        if (!bleCore.isConnected()) showMsg("设备已断开连接")
        Log.d("TAG", "onPropertyOperate: ${characteristic.uuid}")
        when (operateName) {
            READ -> bleCore.readCharacteristic(characteristic)
            WRITE, WRITE_NO_RESPONSE -> showWriteDataDialog(characteristic, operateName)
            NOTIFY, INDICATE -> bleCore.notifyEnable(characteristic, characteristic.descriptors[0].uuid, operateName)
            BROADCAST, AUTHENTICATED_SIGNED_WRITES, EXTENDED_PROPERTIES -> showMsg(operateName)
        }
    }
那么到现在为止我们就写好了基本的操作方式。
三、收到数据
下面我们写一下接收通知的回调,同样是在BleGattCallback中增加这个回调,代码如下所示:
        /**
         * 收到数据回调 Android 13及以上使用
         */
        override fun onCharacteristicChanged(gatt: BluetoothGatt, characteristic: BluetoothGattCharacteristic, value: ByteArray) {
            deviceInfo("收到特性值(Android 13及以上):${BleUtils.getShortUUID(characteristic.uuid)}:${BleUtils.bytesToHex(value, true)}")
        }

        /**
         * 收到数据回调 Android 12及以下使用
         */

        @Deprecated("Deprecated in Java")
        override fun onCharacteristicChanged(gatt: BluetoothGatt, characteristic: BluetoothGattCharacteristic) {
            deviceInfo("收到特性值(Android 12及以下):${BleUtils.getShortUUID(characteristic.uuid)}:${BleUtils.bytesToHex(characteristic.value, true)}")
        }
下面我们运行一下,这里你要以自己的实际设备为准,比如我用的这个设备,包括数据的交互都是厂商自定义的,下面我先开启Notify然后写入数据,再看是否有数据返回。
我们再看一下控制台日志
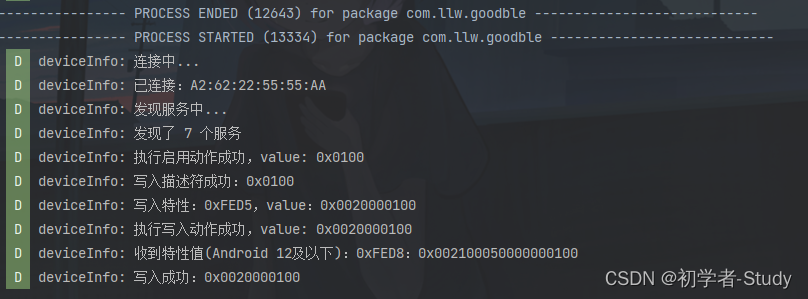
可以看到在执行写入动作成功之后,就收到了设备所回复的特征值数据,然后再是收到写入成功的日志打印。
文章来源于互联网:Android Ble蓝牙App(五)数据操作
1、本站所有资源均从互联网上收集整理而来,仅供学习交流之用,因此不包含技术服务请大家谅解!
2、本站不提供任何实质性的付费和支付资源,所有需要积分下载的资源均为网站运营赞助费用或者线下劳务费用!
3、本站所有资源仅用于学习及研究使用,您必须在下载后的24小时内删除所下载资源,切勿用于商业用途,否则由此引发的法律纠纷及连带责任本站和发布者概不承担!
4、本站站内提供的所有可下载资源,本站保证未做任何负面改动(不包含修复bug和完善功能等正面优化或二次开发),但本站不保证资源的准确性、安全性和完整性,用户下载后自行斟酌,我们以交流学习为目的,并不是所有的源码都100%无错或无bug!如有链接无法下载、失效或广告,请联系客服处理!
5、本站资源除标明原创外均来自网络整理,版权归原作者或本站特约原创作者所有,如侵犯到您的合法权益,请立即告知本站,本站将及时予与删除并致以最深的歉意!
6、如果您也有好的资源或教程,您可以投稿发布,成功分享后有站币奖励和额外收入!
7、如果您喜欢该资源,请支持官方正版资源,以得到更好的正版服务!
8、请您认真阅读上述内容,注册本站用户或下载本站资源即您同意上述内容!
原文链接:https://www.dandroid.cn/21085,转载请注明出处。

评论0