本篇介绍
本篇介绍下如何在macos上编译android的ffmpeg,并在android工程中使用。
编译ffmpeg
ffmpeg代码下载:
git clone https://git.ffmpeg.org/ffmpeg.git ffmpeg对configure做如下修改:
diff --git a/configure b/configure
index f9fdf58bc3..d874b762f9 100755
--- a/configure
+++ b/configure
@@ -2511,6 +2511,7 @@ CMDLINE_SET="
     objcc
     cpu
     cross_prefix
+    cross_prefix_clang
     custom_allocator
     cxx
     dep_cc
@@ -4352,8 +4353,8 @@ if test "$target_os" = android; then
 fi

 ar_default="${cross_prefix}${ar_default}"
-cc_default="${cross_prefix}${cc_default}"
-cxx_default="${cross_prefix}${cxx_default}"
+cc_default="${cross_prefix_clang}${cc_default}"
+cxx_default="${cross_prefix_clang}${cxx_default}"
 nm_default="${cross_prefix}${nm_default}"
新建一个build_android.sh,内容如下:
#!/bin/bash
set -x
# 目标Android版本
API=29
ARCH=arm64
CPU=armv8-a
TOOL_CPU_NAME=aarch64
#so库输出目录
OUTPUT=./android/$CPU
# NDK的路径,根据自己的NDK位置进行设置
NDK=/Users/shanks/Workspace/tools/android-ndk-r22b/
# 编译工具链路径
TOOLCHAIN=$NDK/toolchains/llvm/prebuilt/darwin-x86_64
# 编译环境
SYSROOT=$TOOLCHAIN/sysroot

TOOL_PREFIX="$TOOLCHAIN/bin/$TOOL_CPU_NAME-linux-android"

CC="$TOOL_PREFIX$API-clang"
CXX="$TOOL_PREFIX$API-clang++"
OPTIMIZE_CFLAGS="-march=$CPU"
function build
{
  ./configure
  --prefix=$OUTPUT
  --target-os=android
  --arch=$ARCH
  --cpu=$CPU
  --disable-asm
  --enable-neon
  --enable-cross-compile
  --enable-shared
  --disable-static
  --disable-doc
  --disable-ffplay
  --disable-ffprobe
  --disable-symver
  --disable-ffmpeg
  --cc=$CC
  --cxx=$CXX
  --sysroot=$SYSROOT
  --extra-cflags="-Os -fpic $OPTIMIZE_CFLAGS"

  make clean all
  # 这里是定义用几个CPU编译
  make -j8
  make install
}
build
把里面NDK的路径换成自己的路径。
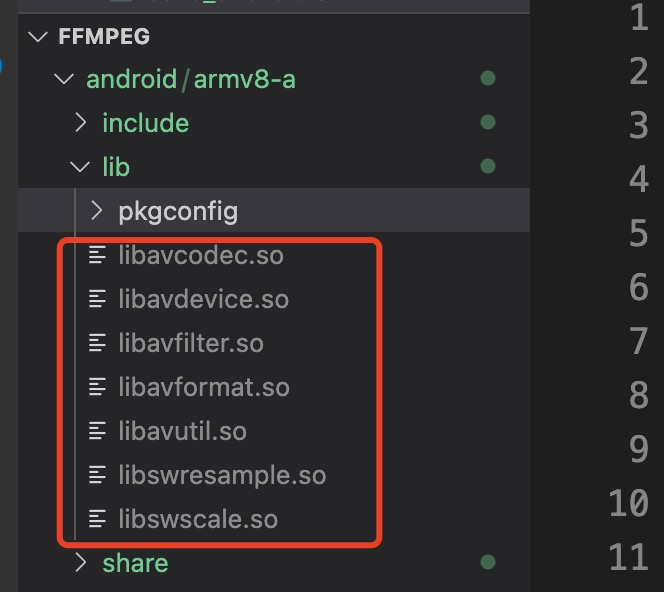
执行这个脚本,就可以看到库编译出来了。

ffmpeg库
在android中使用
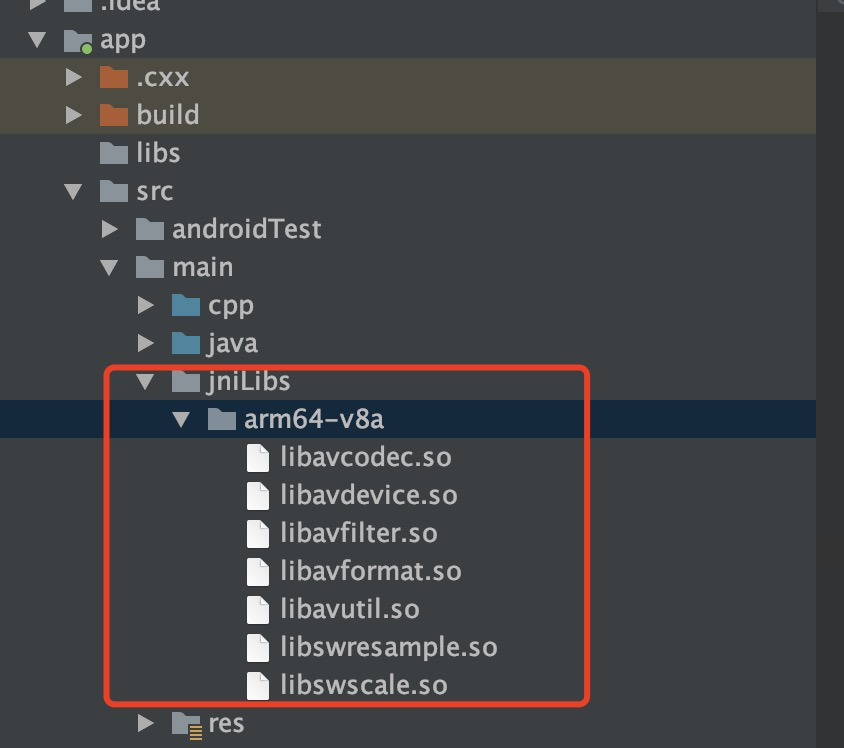
新建一个Native C++工程,然后在src/main下建一个jniLibs目录,并把编译的库拷贝进去。结构如下:

加载库
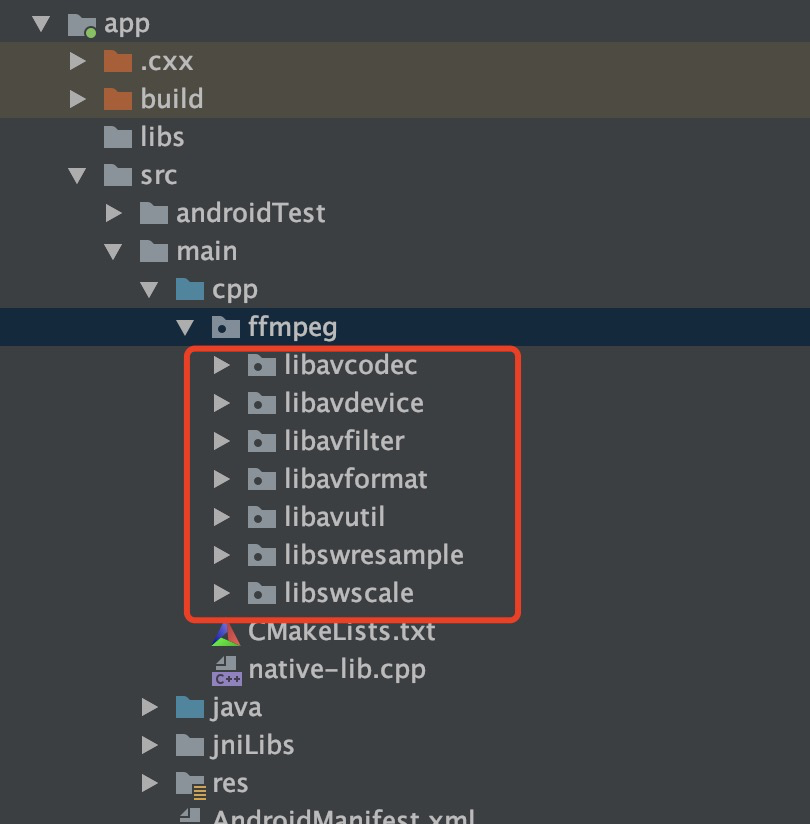
在src/main/cpp下新建一个ffmpeg目录,把编译的头文件也拷贝过来,结构如下:

拷贝头文件
修改CMakelists.txt,内容如下:
# For more information about using CMake with Android Studio, read the
# documentation: https://d.android.com/studio/projects/add-native-code.html

# Sets the minimum version of CMake required to build the native library.

cmake_minimum_required(VERSION 3.4.1)

# Creates and names a library, sets it as either STATIC
# or SHARED, and provides the relative paths to its source code.
# You can define multiple libraries, and CMake builds them for you.
# Gradle automatically packages shared libraries with your APK.

set(CMAKE_CXX_FLAGS "${CMAKE_CXX_FLAGS} -std=gnu++11")
set(ffmpeg_lib_dir ${CMAKE_SOURCE_DIR}/../jniLibs/${ANDROID_ABI})
set(ffmpeg_head_dir ${CMAKE_SOURCE_DIR})

include_directories(${ffmpeg_head_dir}/ffmpeg)
include_directories(${ffmpeg_head_dir}/include)

add_library( avutil
        SHARED
        IMPORTED )
set_target_properties( avutil
        PROPERTIES IMPORTED_LOCATION
        ${ffmpeg_lib_dir}/libavutil.so )

add_library( swresample
        SHARED
        IMPORTED )
set_target_properties( swresample
        PROPERTIES IMPORTED_LOCATION
        ${ffmpeg_lib_dir}/libswresample.so )

add_library( avcodec
        SHARED
        IMPORTED )
set_target_properties( avcodec
        PROPERTIES IMPORTED_LOCATION
        ${ffmpeg_lib_dir}/libavcodec.so )

add_library( avfilter
        SHARED
        IMPORTED)
set_target_properties( avfilter
        PROPERTIES IMPORTED_LOCATION
        ${ffmpeg_lib_dir}/libavfilter.so )

add_library( swscale
        SHARED
        IMPORTED)
set_target_properties( swscale
        PROPERTIES IMPORTED_LOCATION
        ${ffmpeg_lib_dir}/libswscale.so )

add_library( avformat
        SHARED
        IMPORTED)
set_target_properties( avformat
        PROPERTIES IMPORTED_LOCATION
        ${ffmpeg_lib_dir}/libavformat.so )

add_library( avdevice
        SHARED
        IMPORTED)
set_target_properties( avdevice
        PROPERTIES IMPORTED_LOCATION
        ${ffmpeg_lib_dir}/libavdevice.so )

add_library( # Sets the name of the library.
             native-lib

             # Sets the library as a shared library.
             SHARED

             # Provides a relative path to your source file(s).
             native-lib.cpp )

# Searches for a specified prebuilt library and stores the path as a
# variable. Because CMake includes system libraries in the search path by
# default, you only need to specify the name of the public NDK library
# you want to add. CMake verifies that the library exists before
# completing its build.

find_library( # Sets the name of the path variable.
              log-lib

              # Specifies the name of the NDK library that
              # you want CMake to locate.
              log )

# Specifies libraries CMake should link to your target library. You
# can link multiple libraries, such as libraries you define in this
# build script, prebuilt third-party libraries, or system libraries.

target_link_libraries( # Specifies the target library.
                       native-lib

                       avutil
                       swresample
                       avcodec
                       avfilter
                       swscale
                       avformat
                       avdevice

                       # Links the target library to the log library
                       # included in the NDK.
                       ${log-lib} )
再在gradle里面加载该库:
externalNativeBuild {
        cmake {
            path "src/main/cpp/CMakeLists.txt"
            version "3.10.2"
        }
        defaultConfig {
            ndk {
                abiFilters 'arm64-v8a'
            }
        }
        sourceSets {
            main {
                jniLibs.srcDirs = ["src/main/jniLibs"]
            }
        }
}接下来就是写代码调用了,从官网(https://www.ffmpeg.org/doxygen/4.1/avio_reading_8c-example.html)copy一个example, 放到native-lib.cpp中,完整如下:
#include
#include
#include "android/log.h"
#include
#include

extern "C" {
#include "ffmpeg/libavformat/avformat.h"
#include "ffmpeg/libavcodec/avcodec.h"
#include "ffmpeg/libavutil/macros.h"
#include "ffmpeg/libavutil/error.h"
#include "ffmpeg/libavutil/file.h"

}


struct buffer_data {
    uint8_t *ptr;
    size_t size; ///< size left in the buffer
};
static int read_packet(void *opaque, uint8_t *buf, int buf_size)
{
    struct buffer_data *bd = (struct buffer_data *)opaque;
    buf_size = FFMIN(buf_size, bd->size);
    if (!buf_size)
        return AVERROR_EOF;
    __android_log_print(ANDROID_LOG_INFO, "lhr","ptr:%p size:%zun", bd->ptr, bd->size);
    /* copy internal buffer data to buf */
    memcpy(buf, bd->ptr, buf_size);
    bd->ptr  += buf_size;
    bd->size -= buf_size;
    return buf_size;
}

void StartPlay(const std::string &path) {
    AVFormatContext *fmt_ctx = nullptr;
    AVIOContext *avio_ctx = nullptr;
    uint8_t *buffer = nullptr, *avio_ctx_buffer = nullptr;
    size_t buffer_size, avio_ctx_buffer_size = 4096;
    char *input_filename = nullptr;
    int ret = 0;
    struct buffer_data bd = { 0 };
    input_filename = const_cast(path.data());

    ret = av_file_map(input_filename, &buffer, &buffer_size, 0, NULL);
    if (ret < 0) {
        goto end;
    }

    bd.ptr  = buffer;
    bd.size = buffer_size;

    if (!(fmt_ctx = avformat_alloc_context())) {
        ret = AVERROR(ENOMEM);
        goto end;
    }
    avio_ctx_buffer = static_cast(av_malloc(avio_ctx_buffer_size));
    if (!avio_ctx_buffer) {
        ret = AVERROR(ENOMEM);
        goto end;
    }

    avio_ctx = avio_alloc_context(avio_ctx_buffer, avio_ctx_buffer_size,
                                  0, &bd, &read_packet, NULL, NULL);
    if (!avio_ctx) {
        ret = AVERROR(ENOMEM);
        goto end;
    }
    fmt_ctx->pb = avio_ctx;
    ret = avformat_open_input(&fmt_ctx, NULL, NULL, NULL);
    if (ret < 0) {
        __android_log_print(ANDROID_LOG_INFO, "lhr", "Could not open inputn");
        goto end;
    }

    ret = avformat_find_stream_info(fmt_ctx, NULL);
    if (ret < 0) {
        __android_log_print(ANDROID_LOG_INFO, "lhr","Could not find stream informationn");
        goto end;
    }
    av_dump_format(fmt_ctx, 0, input_filename, 0);
    __android_log_print(ANDROID_LOG_INFO, "lhr","av_dump_format finish");

    end:
    avformat_close_input(&fmt_ctx);
    /* note: the internal buffer could have changed, and be != avio_ctx_buffer */
    if (avio_ctx) {
        av_freep(&avio_ctx->buffer);
        av_freep(&avio_ctx);
    }
    av_file_unmap(buffer, buffer_size);
    if (ret < 0) {
        return;
    }
}

extern "C" JNIEXPORT jstring JNICALL
Java_com_example_ffmpegdemo_MainActivity_stringFromJNI(
        JNIEnv* env,
        jobject /* this */) {
    std::string hello = "Hello from C++";
    return env->NewStringUTF(hello.c_str());
}

extern "C" JNIEXPORT void JNICALL
Java_com_example_ffmpegdemo_MainActivity_startPlayJNI(
        JNIEnv* env,
        jobject thiz, jstring str) {
    const jsize len = env->GetStringUTFLength(str);
    const char* strChars = env->GetStringUTFChars(str, (jboolean *)0);
    std::string path(strChars,  len);
    StartPlay(path);
    env->ReleaseStringUTFChars(str, strChars);
}
然后再在java侧传递一个path,这样就可以调用了。需要注意的是av_file_map在Android 30上会报权限问题,暂时的修改方法是把compileSdkVersion和targetSdkVersion修改成28或以下即可。
下载说明:
1、本站所有资源均从互联网上收集整理而来,仅供学习交流之用,因此不包含技术服务请大家谅解!
2、本站不提供任何实质性的付费和支付资源,所有需要积分下载的资源均为网站运营赞助费用或者线下劳务费用!
3、本站所有资源仅用于学习及研究使用,您必须在下载后的24小时内删除所下载资源,切勿用于商业用途,否则由此引发的法律纠纷及连带责任本站和发布者概不承担!
4、本站站内提供的所有可下载资源,本站保证未做任何负面改动(不包含修复bug和完善功能等正面优化或二次开发),但本站不保证资源的准确性、安全性和完整性,用户下载后自行斟酌,我们以交流学习为目的,并不是所有的源码都100%无错或无bug!如有链接无法下载、失效或广告,请联系客服处理!
5、本站资源除标明原创外均来自网络整理,版权归原作者或本站特约原创作者所有,如侵犯到您的合法权益,请立即告知本站,本站将及时予与删除并致以最深的歉意!
6、如果您也有好的资源或教程,您可以投稿发布,成功分享后有站币奖励和额外收入!
7、如果您喜欢该资源,请支持官方正版资源,以得到更好的正版服务!
8、请您认真阅读上述内容,注册本站用户或下载本站资源即您同意上述内容!
原文链接:https://www.dandroid.cn/21352,转载请注明出处。


评论0