协程 kotlin Coroutine
目录:
1. Coroutine 的基本使用
1.1 小结
2. CoroutineScope 类 和 coroutineScope(xxx) 方法
- 2.1
CoroutineScope使用的代码示例
– 2.1.1 在Activity中的使用
– 2.1.2 在ViewModel中使用以及为什么要在ViewModel中使用 - 2.2
ViewModel自动销毁CoroutineScope的逻辑 - 2.3
withContext(xxx)用作切换线程 - 2.4 小结
3. launch -> 创建协程
- 3.1
launch()的参数和返回结果说明 - 3.2 什么是
Job - 3.3
CoroutineScope.async()方法 - 3.4 小结
4. suspend 是什么,「挂起」作用是什么
- 4.1 「挂起函数」的使用和代码运行分析
- 4.1.1 同一线程中代码运行逻辑
- 4.1.2 在当前线程中新建一个线程的代码运行逻辑–未使用
suspend - 4.1.3 使用了
suspend标注, 代码的运行逻辑
- 4.2 「非阻塞挂起」的含义
- 4.3 完整测试代码以及执行结果
- 4.4
suspend b()运行时的线程切换 - 4.5 插入一个小点:调度器和线程池
- 4.6 「挂起函数」小结
5. 调度器 CoroutineDispatcher
- 5.1
CoroutineDispatcher的种类
6. 说一说协程中常见的类
- 6.1
CoroutineContext的继承关系 - 6.2
Coroutine的继承关系
7. 总结
正文
想着把协程说清楚的目的,能不能说清楚,看看下面行不行。
coroutines 协程从 kotlin 1.3 开始发布正式版,不在是实验阶段了。
修改地址 1.3 changeLog
github 地址: kotlinx.coroutines
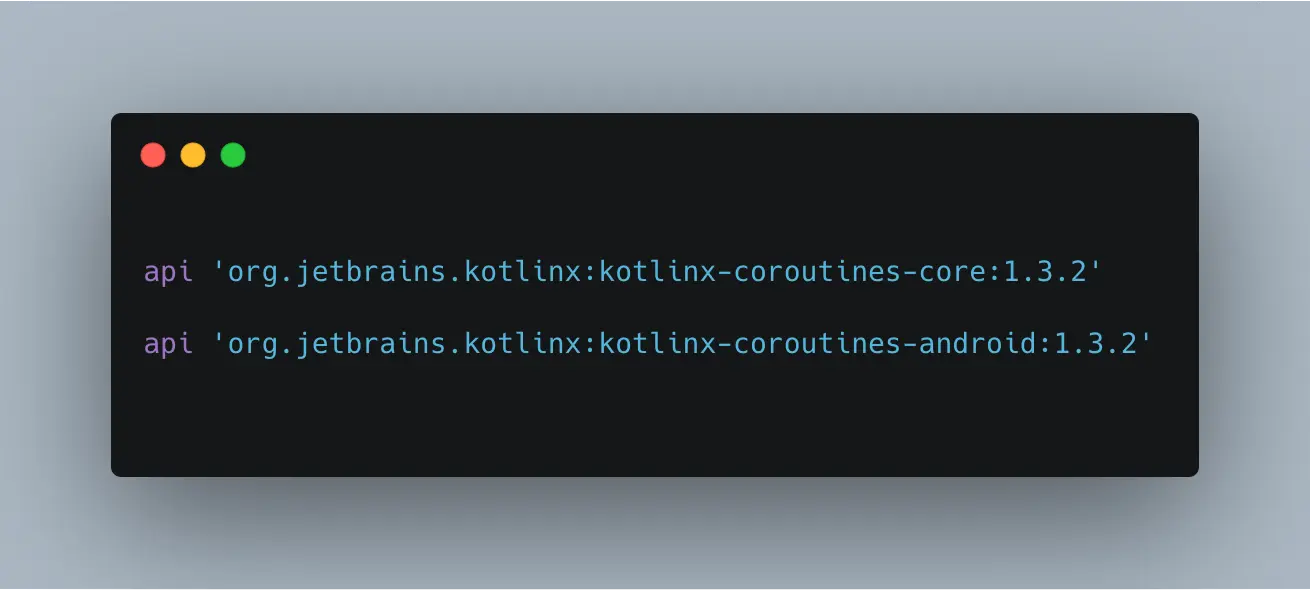
目前协程已经支持了多平台,在 Android 中使用需要添加依赖:
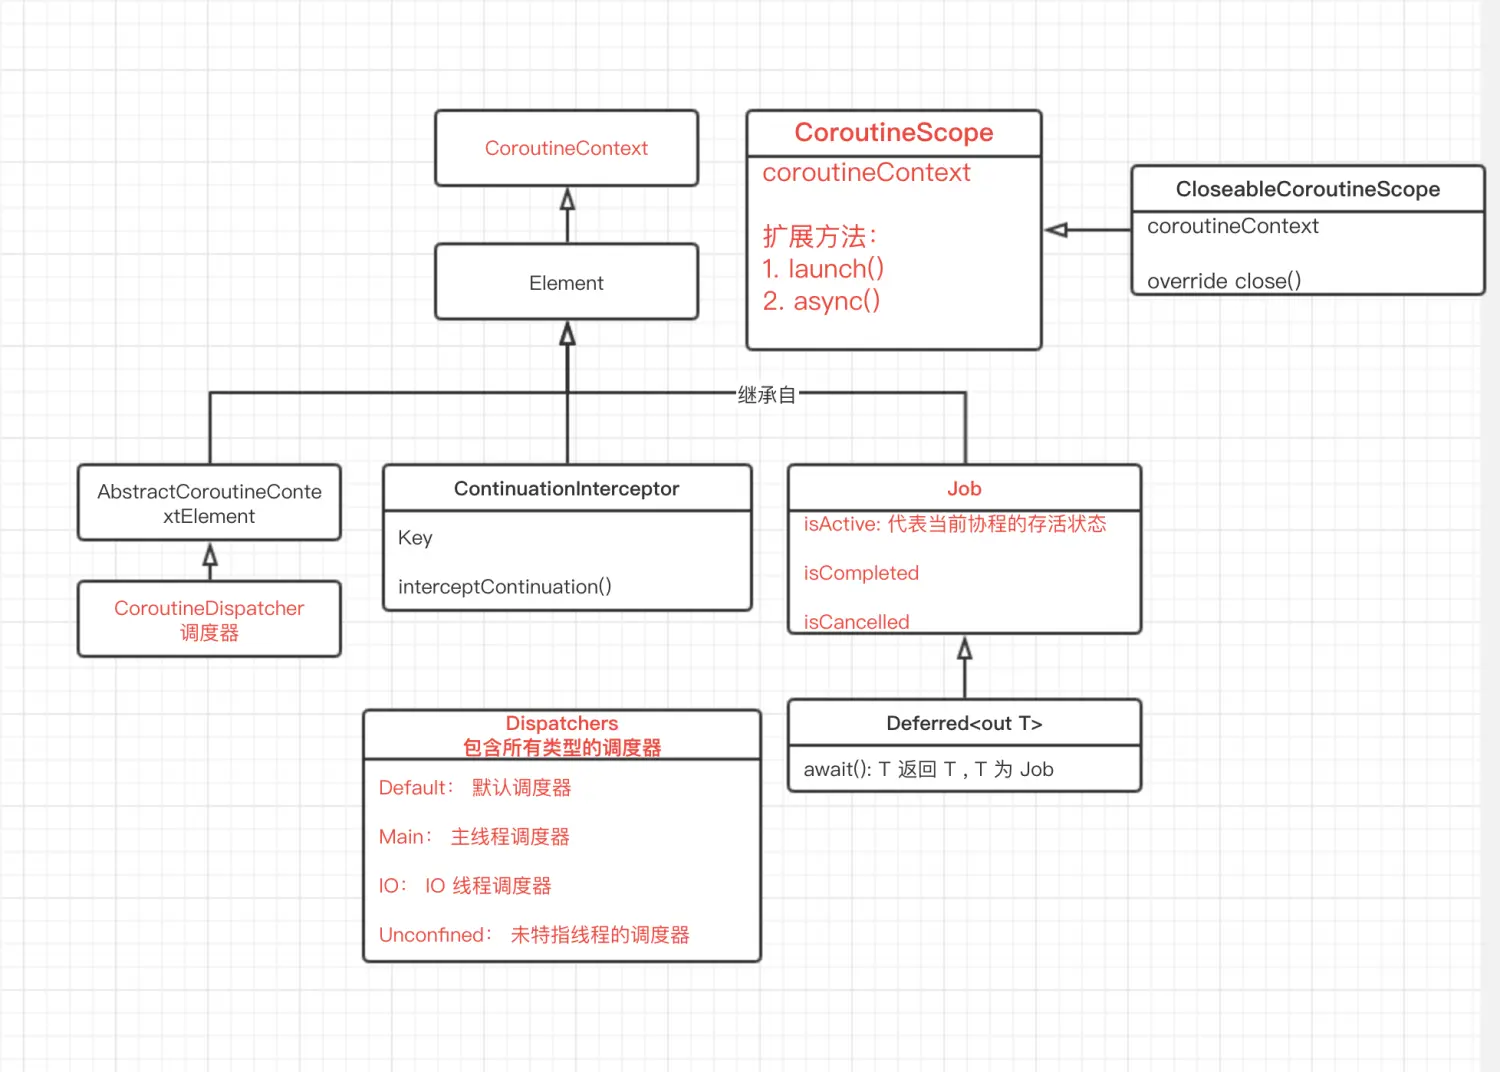
先把协程中的部分类的继承关系梳理一下,这里先简单的用一张类继承图表示,详细的一些类的介绍,会在下面的内容逐渐涉及到。
1. Coroutine 的基本使用
官方示例代码如下:
suspend fun main() = coroutineScope {
    launch {
       delay(1000)
       println("Kotlin Coroutines World!")
    }
    println("Hello")
}
代码运行结果如下:
Hello
Kotlin Coroutines World!
从运行结果来看,launch{} 中的代码应该和外面的代码不再同一个线程,下面我们验证一下。
我们把代码稍微修改一下,再次运行一下:
suspend fun mainTest() {
    coroutineScope {
        println("11111 线程 是" + Thread.currentThread())
        launch {
            println("22222 线程 是" + Thread.currentThread())
            delay(1000)
            println("Kotlin Coroutines World!")
        }
        println("33333 线程 是" + Thread.currentThread())
    }
}
这是代码运行结果为:
11111 线程 是Thread[main,5,main]
33333 线程 是Thread[main,5,main]
22222 线程 是Thread[DefaultDispatcher-worker-1 @coroutine#1,5,main]
Kotlin Coroutines World!
可参考链接:https://play.kotlinlang.org/#eyJ2ZXJzaW9uIjoiMS4zLjMwIiwiY29kZSI6ImltcG9ydCBrb3RsaW54LmNvcm91dGluZXMuKlxuXG5zdXNwZW5kIGZ1biBtYWluKCkge1xuICAgIHByaW50bG4oXCJIZWxsbyDlpJbpg6ggXCIpXG4gICAgY29yb3V0aW5lU2NvcGUge1xuICAgIHByaW50bG4oXCIxMTExMee6v+eoiyDmmK9cIiArIFRocmVhZC5jdXJyZW50VGhyZWFkKCkpXG4gICAgbGF1bmNoIHsgXG4gICAgICAgcHJpbnRsbihcIjIyMjIy57q/56iLIOaYr1wiICsgVGhyZWFkLmN1cnJlbnRUaHJlYWQoKSlcbiAgICAgICBkZWxheSgxMDAwKVxuICAgICAgIHByaW50bG4oXCJLb3RsaW4gQ29yb3V0aW5lcyBXb3JsZCFcIikgXG4gICAgfVxuICAgIHByaW50bG4oXCIgMzMzMyDnur/nqIsg5pivXCIgKyBUaHJlYWQuY3VycmVudFRocmVhZCgpKVxuICAgIHByaW50bG4oXCJIZWxsb1wiKVxuICAgIH1cbiAgICBwcmludGxuKFwiSGVsbG8g5aSW6YOoIGVuZFwiKVxufSAiLCJwbGF0Zm9ybSI6ImphdmEiLCJhcmdzIjoiIn0=
我们发现,在 coroutineScope 中,默认是和外部在同一个线程中的。而 launch {}会切换到默认的一个子线程中 DefaultDispatcher, 而不会影响主线程 println("33333 线程 是"的执行。
这个代码中,牵扯到三部分,
- 什么是
coroutineScope()和CoroutineScope - 什么是
launch - 什么是
suspend
下面聊一下这三个部分是什么,以及如何使用它们。
1.1 小结
上述内容简单的介绍了协程的基本使用以及代码运行的线程关系。
同时引入了三个部分:
CoroutineScopelaunchsuspend
下面内容会依次介绍。
2. CoroutineScope 类和 coroutineScope(xxx) 方法
CoroutineScope 是一个接口,它为协程定义了一个范围「或者称为 作用域」,每一个协程创建者都是它的一个「扩展方法」。
上面的说法,意思是什么呢?
- 1.首先协程在这个
Scope内运行,不能超过这个范围。 - 2. 协程只有在
CoroutineScope才能被创建
因为目前所有协程的创建方法, 例如launch(),async()全部是CoroutineScope的扩展方法。
CoroutineScope 是一个接口, 源码如下:
/**
*
*/
public interface CoroutineScope {
    /**
     * The context of this scope.
     * Context is encapsulated by the scope and used for implementation of coroutine builders that are extensions on the scope.
     * Accessing this property in general code is not recommended for any purposes except accessing the [Job] instance for advanced usages.
     *
     * By convention, should contain an instance of a [job][Job] to enforce structured concurrency.
     */
    public val coroutineContext: CoroutineContext
}
它里面包含一个成员变量 coroutineContext, 是当前 CoroutineScope 的 context.
coroutineContext可以翻译成「协程上下文」,但和Android中的Context有很大不同。
CoroutineContext是一个协程各种元素的集合。
后面再介绍CoroutineContext
coroutineScope{} 和 CoroutineScope 不同,coroutineScope{} 是一个方法, 它可以创建一个 CoroutineScope 并在里面运行一些代码。
coroutineScope{} 这个会在什么时候结束呢?代码注释中写着:
This function returns as soon as the given block and all its children coroutines are completed.
当传入的闭包和它里面所有的子协程都执行完成时才会返回。因为它是一个 suspend 函数,会在它里面所有的「内容」都运行完,才会结束。
2.1 CoroutineScope 使用的代码示例
在源码的注释中,写了它的使用示例。
2.2.1 在 Activity 中的使用
在 Activity 里,你可以这么使用:
class MyActivity : AppCompatActivity(), CoroutineScope by MainScope() {
    override fun onDestroy() {
        cancel() // cancel is extension on CoroutineScope
    }

    fun showSomeData() = launch {
        // <- extension on current activity, launched in the main thread
        // ... here we can use suspending functions or coroutine builders with other dispatchers
       draw(data) // draw in the main thread
    }
}
MyActivity 中实现了 CoroutineScope 接口,并且默认是创建了一个 MainScope().
MainScope()本质上是Creates the main [CoroutineScope] for UI components.是为主线程上创建了一个CoroutineScope,即这个scope里的协程运行在「主线程」(如果未特别指定其他线程的话)MainScope(): CoroutineScope = ContextScope(SupervisorJob() + Dispatchers.Main)
Dispatchers为「协程调度器」, 后面在介绍它。
上面为源码中的示例。
2.2.2 在 ViewModel 中使用以及为什么要在 ViewModel 中使用
一般情况下,在 Android 我们更愿意把协程部分放入到 ViewModel 中使用,而不是在 Activity 或者 Fragment 中使用。
为什么呢? 在上面的示例代码中,我们需要在 onDestroy() 中去手动调用一下 cancel() -> MainScpe 会销毁里面的协程。.
而在 ViewModel 中,默认有一个扩展成员是 ViewModel.viewModelScope, 且它会在 ViewModel 被销毁时自动回收, 而 ViewModel 又是和 Activity 生命周期相关的,因此可以放心大胆使用,会自动销毁回收。
同时也是为了把耗时的操作和 UI 剥离,让代码更加的清晰, 代码示例:
class FirstHomeViewModel : ViewModel() {
    ....
    /**
     * 获取首页 banner 信息
     */
    fun getBannerData() {
        viewModelScope.launch(IO) {
            // 做一些网络请求类似的操作
            ...
            withContext(Main) {
                ...
            }
        }
    }
}
在上述代码中,我们利用 viewModelScope.launch(IO) 在 IO 线程中创建了一个协程, 在该协程里面做一些耗时的操作,然后通过 withContext(Main) 切换到主线程,可以做一些刷新数据和 UI 的操作。
可参考谷歌开源库
plaid: https://github.com/android/plaid
以及我的另外一篇文章:https://www.jianshu.com/p/f5e16605d80c
2.2 ViewModel 自动销毁 CoroutineScope 的逻辑
todo ViewModel 的自动销毁
上面我们提到过,在 ViewModel 中是会自动释放协程的,那么是如何实现的呢?
viewModelScope() 源码如下:
val ViewModel.viewModelScope: CoroutineScope
        get() {
            val scope: CoroutineScope? = this.getTag(JOB_KEY)
            if (scope != null) {
                return scope
            }
            return setTagIfAbsent(JOB_KEY,
                CloseableCoroutineScope(SupervisorJob() + Dispatchers.Main.immediate))
        }
其中 setTagIfAbsent(xxx) 会把当前 CloseableCoroutineScope 存放在 mBagOfTags 这个 hashMap 中。
当 ViewModel 被销毁时会走 clear() 方法:
MainThread
final void clear() {
    mCleared = true;
    // Since clear() is final, this method is still called on mock objects
    // and in those cases, mBagOfTags is null. It'll always be empty though
    // because setTagIfAbsent and getTag are not final so we can skip
    // clearing it
    if (mBagOfTags != null) {
        synchronized (mBagOfTags) {
            for (Object value : mBagOfTags.values()) {
                // see comment for the similar call in setTagIfAbsent
                closeWithRuntimeException(value);
            }
        }
    }
    onCleared();
}
这里,会把 mBagOfTags 这个 Map 中的所有 value 取出来,做一个 close 操作,也就是在这里,对我们的 coroutinesScope 做了 close() 操作,从而取消它以及取消它里面的所有协程。
2.3 withContext(xxx) 用作切换线程
当然,我们使用协程,很多时候,是需要一些耗时的操作在协程里面完成,等到这个操作完成后,我们就需要再次切换到主线程执行应有的逻辑,那么在协程里面,给我们提供了 withContext(xxx) 方法,使我们可以很方便的来回切换到指定的线程。
有关 withContext(xxx) 的定义:
/**
* Calls the specified suspending block with a given coroutine context, suspends until it completes, and returns the result.
*/
public suspend fun  withContext(
    context: CoroutineContext,
    block: suspend CoroutineScope.() -> T
): T = suspendCoroutineUninterceptedOrReturn sc@ {
    ...
}
方法的含义为:在指定的 coroutineContext 中运行挂起的闭包,该方法会一只挂起直到它完成,并且返回闭包的执行结果。
它有两个参数,第一个用作指定在那个线程,第二个是要执行的闭包逻辑。
源码的注释中还有一句话:This function uses dispatcher from the new context, shifting execution of the [block] into the different thread if a new dispatcher is specified, and back to the original dispatcher when it completes.
翻译过来就是,在这个方法中,它会切换到新的调度器 「在这里可理解为在新的被指定的线程中」里执行 block 的代码,并且在它完成时,会自动回到原本的 dispatcher 中。
用更通俗的话就是: withContext() 在执行时,首先会从 A 线程 切换到被你指定的 B 线程中,然后等到 withContext() 执行结束会,它会自动再切换到 A 线程。
A->B: 切换线程到 B
B-->A: 执行结束后,自定切回线程到 A
这也是 withContext() 的方便之处, 在 java 代码中,没有这种效果的类似实现。
也因为 withContext() 可以自动把线程切回来的特性,从而消除了一些代码的嵌套逻辑,使得代码更易懂, 再加上 suspend 挂起函数的特性,代码浏览起来更加舒服。
例如代码:
fun getBannerData() {
    viewModelScope.launch(IO) {
        Log.i("zc_test", "11111 current thread is ${Thread.currentThread()}")
        withContext(Main) {
            Log.i("zc_test", "22222 current thread is ${Thread.currentThread()}")
        }
        Log.i("zc_test", "33333 current thread is ${Thread.currentThread()}")
    }
}
运行结果为:
2019-12-19 15:40:51.786 14920-15029/com.chendroid.learning I/zc_test: 11111 current thread is Thread[DefaultDispatcher-worker-3,5,main]

2019-12-19 15:40:51.786 14920-14920/com.chendroid.learning I/zc_test: 22222 current thread is Thread[main,5,main]

2019-12-19 15:40:51.789 14920-15029/com.chendroid.learning I/zc_test: 33333 current thread is Thread[DefaultDispatcher-worker-3,5,main]
「11111」 和 「33333」 两处位置所在的线程是一致的。
2.4 小结
上面我们写了很多内容,简单的总结一下,以防遗忘。
CoroutineScope是协程Coroutine的作用域,只有在CoroutineScope内,协程才可以被创建,且协程只能运行在这个范围内。ViewModel具有自动释放CoroutineScope的作用,是生命安全的。withContext(xxx)可在协程内切换线程, 并且具有自动切回原线程的能力。
3. 什么是 launch — 创建协程
上面很多地方,都或多或少的使用到了 launch() 方法, 那么它到底是什么呢?有那些需要注意的地方呢?我们一起来看一下。
launch() 会在当前的 coroutineScope 中新建一个协程,它是开启一个协程的一种方式。
正如在 「什么是 CoroutineScope」 里面说的,launch() 是 CoroutineScope 的一个扩展方法。
官方源码为:
public fun CoroutineScope.launch(
    context: CoroutineContext = EmptyCoroutineContext,
    start: CoroutineStart = CoroutineStart.DEFAULT,
    block: suspend CoroutineScope.() -> Unit
): Job {
    val newContext = newCoroutineContext(context)
    val coroutine = if (start.isLazy)
        LazyStandaloneCoroutine(newContext, block) else
        StandaloneCoroutine(newContext, active = true)
    coroutine.start(start, coroutine, block)
    return coroutine
}
它接收三个参数: context , start, block, 返回结果为 Job
3.1 launch() 的参数和返回结果说明
context为CoroutineContext:
用于标明当前协程运行的CoroutineContext,简单来说就是当前coroutine运行在哪个调度器上, 在这里如果不指定的话,默认会继承当前viewModelScope所在的主线程的主线程调度器,即「Main = MainCoroutineDispatcher」start: CoroutineStart意思是coroutine什么时候开始运行.
默认为CoroutineStart.DEFAULT, 意思是:立即根据它的CoroutineContext执行该协程。block闭包, 会在一个suspend挂起函数里面运行该闭包。
在闭包中,是我们真正需要执行的逻辑。- 返回结果为
Job:
用于管理这个协程,可采用job.cancel()来取消这个协程的运行。
那么什么是 job 呢?下面简单聊一下 Job
3.2 什么是 Job
Job 中文意思是「工作」, 官方的定义为:它是一个可取消的,其生命周期最终为完成状态的事物。
可以简单的暂时把它理解为 coroutine 协程的一个代表,它可以获取当前协程的状态,也可以取消该协程的运行。
public interface Job : CoroutineContext.Element {
    ...
}
其实它也是 CoroutineContext 的一个子类,「Element 是 CoroutineContext 的一个子类」。
Job 有三种状态:
isActive:true表示该Job已经开始,且尚未结束和被取消掉。isCompleted:true表示该Job已经结束「包括失败和被取消」isCancelled:true表示该Job被取消掉
在源码中,有这么一些描述,可以看作一张图,我以一个表格的形式展示:
job 有一些状态
| State | isActive |
isCompleted |
isCancelled |
|---|---|---|---|
| New (optional initial state) | false |
false |
false |
| Active (default initial state) | true |
false |
false |
| Completing (transient state) | true |
false |
false |
| Cancelling (transient state) | false |
false |
true |
| Cancelled (final state) | false |
true |
true |
| Completed (final state) | false |
true |
false |
生命周期流程图:
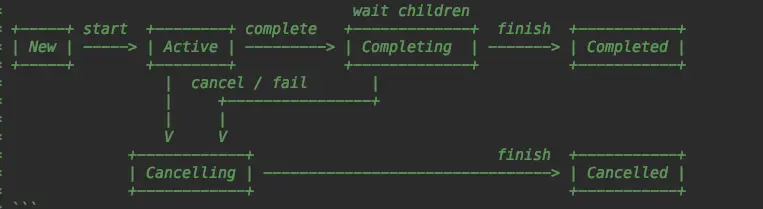
从某个角度浅显的理解,Job 可代指一个协程 Coroutine 的各种状态。
3.3 CoroutineScope.async() 方法
除了 launch() 之外,在协程中还有一个和它类似的方法用于创建协程,是 CoroutineScope.async().
async() 和 launch() 的最大不同是返回结果的不同,launch()是返回一个 job, 而 async() 返回的是 Deferred
Deferred 的翻译为:「推迟」, 那它是什么呢?源码如下:
public interface Deferred : Job {
    ....
}
额,其实它本身是一个 Job 的子类,也就是说,Deferred 和 Job 的生命周期流程是一样的,且也可控制 Coroutine.
它是一个带着结果 「result」 Job.
可通过调用 Deferred.await() 等待异步结果的返回。
我们可以通过 async 实现两个并发的网络请求,例如:
// todo
suspend fun testAsync() {
    coroutineScope {
        val time = measureTimeMillis {
            val one = async { doSomethingsOne() }
            val two = async { doSomethingsTwo() }
            println("the result is ${one.await() + two.await()}")
        }

        println("完成时间为 time is $time ms")
    }
}

private suspend fun doSomethingsOne(): Int {
    // 假设做了些事情,耗时
    delay(1000L)
    return 17
}

private suspend fun doSomethingsTwo(): Int {
    // 假设做了些事情,耗时
    delay(1000L)
    return 30
}
运行结果为下:
the result is 47
完成时间为 time is 1017 ms
这里时间是小于 2000 ms 的,原因就是上面两个协程是并发运行的。
当然
await()也是一个挂起函数
3.4 小结
上面内容中,我们总结了
launch()的作用—— 是用来新建一个协程。launch()中各个参数的函数;launch()的返回结果job的意义,以及它能够获取到当前协程的各种状态- 创建协程的另外一种方式:
async()的简单说明
4. 什么是 suspend
我们已经无数次在前面提到 suspend 挂起函数了,那么「挂起函数」到底是代表着什么意思呢?「非阻塞挂起」又是什么意思呢?
4.1 「挂起函数」的使用和代码运行分析
suspend 是 kotlin 中的一个关键字,它本身的意思是「挂起」。
在 kotlin 中,被它标注的函数,被称为「挂起函数」。
suspend function should be called only from a coroutine or another suspend function
首先「挂起函数」只能在协程和另外一个挂起函数里面调用。
4.1.1 同一线程中代码运行逻辑
以下面代码为例,假设三个方法都在同一个线程「主线程」运行:
a()
b()
c()
正常的同一线程的代码逻辑,原本就是阻塞式的,:
a()运行结束后,b()开始运行;b()运行结束后,c()开始运行;
a()->b(): a() 运行结束后 b() 执行
b()->c(): b() 运行结束后 c() 执行
4.1.2 在当前线程中新建一个线程的代码运行逻辑–未使用 suspend
如果 b() 中开启了一个子线程去处理逻辑「异步了」,且不使用 suspend 标注 b() 的代码块运行逻辑为:
a()运行结束后,b()开始运行;b()函数中,部分在主线程中的代码运行完后,它开启的子线程代码可能还没运行,c()开始执行
a()->b(): a() 运行结束后 b() 执行
b()->c(): b() 中,在主线程运行结束后「子线程可能刚开始还没结束」, c() 执行
上述代码,其实是说,b() 的异步代码可能会晚与 c() 去执行,因为异步和两个线程,导致代码不再阻塞。
4.1.3 使用了 suspend 标注, 代码的运行逻辑
a()运行结束后,b()开始运行;b()运行结束后「它的子线程也运行结束了」,c()才会开始运行;
a()->b(): a() 运行结束后 b() 执行
b()->c(): b() 运行结束后 c() 执行
可以看到使用了 suspend 标注的函数,会使得当前代码在该函数处处于等待它的完全运行结束。
而 suspend 挂起函数的完全运行结束是指:该函数中的所有代码「可能包含一个新的子线程、」均运行结束。
上述三中不同的代码的运行,其实是想告诉大家 suspend 这个关键字的作用是:
把原本异步的代码,再次变得同步。
当天如果只是简单的同步,那么肯定会有很多问题,
例如主线程等待子线程运行结束的问题,这是很不科学的,与我们把耗时操作放入子线程运行的初衷不符。
当然,协程当然不存在这种问题。它是如何解决的呢?
下面说一说协程的 「非阻塞挂起」
4.2 「非阻塞挂起」
我们还以第三种代码情况说明, 不过这次加入了更多的代码 test2() 方法。
假设完整代码为:
b() 为 suspend 标注的挂起函数, 其他为正常函数
以下为简化代码
fun mainTest() {
    ...
    test()
    test2() // 假设 test2() 运行在主线程
    ...
}

fun test() {
    a()
    b()
    c()
}

fun test2() {
    ...
}
代码实际的执行运行逻辑为:
mainTest()中先执行到test()方法,先运行a()a()运行结束后,「挂起函数」b()开始运行;- 「挂起函数」
b()的主线程代码运行结束后,c()并不会运行,而是test2()开始运行, - 等到「挂起函数」
b()中开启的子线程也运行结束后,c()才会开始运行;
图示为:
mainTest()->test(): 先执行 test() 「主线程」
test()->a(): 顺序执行 a() 「主线程」
a()->b(): a() 结束后,执行挂起函数 b() 「主线程」
b()-->test(): b() 中的主线程完成后,在切到子线程时,会标志 test() 执行结束 「主线程」
test()-->mainTest(): test() 执行结束,会顺序执行 test2(), 「主线程」
b()->c(): 注释 1
注:上图中的注释 1 为:当挂起函数
b()里面的子线程运行结束后,会被协程切换到主线程,然后c()开始运行。
从上面可以看到 suspend 的作用是在当前代码处 「1」暂停运行,转而去运行该线程本身其他地方的逻辑代码,等到该挂起函数中的代码运行结束后「它里面的和它里面的子线程子协程均运行结束后」,才会在暂停处 「1」 继续运行。
注: 上述代码,其实并不完全成立,因为只能在「协程」或者「挂起函数」里面才可以调用「挂起函数」
b(), 因此test()并不成立,这里用于说明代码运行逻辑,故而简化了代码。后面会给出完整的代码。
哪里可以提现出:「非阻塞式挂起」这个含义呢?
就是因为在上面的代码中,在 test() 中的 b() 处挂起时「本身为主线程」,并不会影响到主线程的执行,因为 test2() 在主线程中为正常执行,阻塞的只是该协程内部的代码。
4.3 附上完全测试代码以及执行结果
代码为:
fun test {
    viewModelScope.launch {
        println("viewModelScope.launch ${Thread.currentThread()}")
        mainTest()
        println("viewModelScope.launch 结束了 ${Thread.currentThread()}")
    }

    test2()
}
...
// mainTest() 方法
suspend fun mainTest() {
    println("mainTest() start start start " + Thread.currentThread())
    a()
    b()
    c()
    println("mainTest() end end end" + Thread.currentThread())
}

// 普通函数 test2()
fun test2() {
    println("test2() doing doing doing " + Thread.currentThread())
}
//普通函数 a()
fun a() {
    println("a() doing doing doing " + Thread.currentThread())
}
//普通函数 c()
fun c() {
    println("c() doing doing doing " + Thread.currentThread())
}
// 挂起函数 b()
suspend fun b() {
    println("b() start start start" + Thread.currentThread())
    coroutineScope {
        println("11111 线程 是" + Thread.currentThread())
        launch(IO) {
           println("22222 线程 是" + Thread.currentThread())
           delay(1000)
           println("22222 线程结束" + Thread.currentThread())
        }
        println("33333 线程 是" + Thread.currentThread())
    }
    println("b() end end end" + Thread.currentThread())
}
运行结果为:
I/System.out: viewModelScope.launch Thread[main,5,main]
I/System.out: mainTest() start start start Thread[main,5,main]
    a() doing doing doing Thread[main,5,main]
    b() start start startThread[main,5,main]
I/System.out: 11111 线程 是Thread[main,5,main]
I/System.out: 33333 线程 是Thread[main,5,main]
I/System.out: 22222 线程 是Thread[DefaultDispatcher-worker-2,5,main] 「标注 1」
I/System.out: test2() doing doing doing Thread[main,5,main]         「标注 2」
I/System.out: 22222 线程结束Thread[DefaultDispatcher-worker-9,5,main]
I/System.out: b() end end endThread[main,5,main]
    c() doing doing doing Thread[main,5,main]
    mainTest() end end endThread[main,5,main]
    viewModelScope.launch 结束了 Thread[main,5,main]
可以看到 test2() 的执行是要早于 c() 方法的。
从运行结果上可以看到是和我们的分析一致的。
4.4 suspend b() 运行时的线程切换
从运行结果的 log 上, 我们还可以看到当前代码执行的线程信息。
我们发现 suspend b() 的运行中,
b() start ...在主线程main中- 通过
b()中的launch(IO)我们切换到了IO线程DefaultDispatcher-worker中 - 但是
b()中的子线程运行结束后,我们发现b() end再次回答了主线程main中
在上面的操作中,第三步中,我们并没有显示的调用切回主现场的代码,我们却回到了主线程。
由此说明:suspend 挂起函数在运行结束时会再次切换到原来的线程,真正的切换是有协程帮我们做的
值得一提的是,我们在上面说到
withContext()也具有自动切换原线程的功能。
因为……
withContext()本身就是一个「挂起函数」。
协程是怎么切换到原线程的呢?一家之言,我害怕说不清楚……怂
4.5 这里插入一个小的点。
根据上面,我们知道 suspend 标注的挂起函数,协程会自动帮我们切换到原线程。
看两行 log 信息
...
I/System.out: 22222 线程 是Thread[DefaultDispatcher-worker-2,5,main]
...
I/System.out: 22222 线程结束Thread[DefaultDispatcher-worker-9,5,main]
- 首先
Thread[DefaultDispatcher-worker-2,5,main]这三项分别是什么大部分人应该都知道,这是源码
Thread.toString()方法中的返回值.
第一个参数DefaultDispatcher-worker-2代表的是当前线程的名字getName().
第二个参数5代表的是当前线程的优先级getPriority()默认是5.
第三个参数main代表的是当前线程属于哪个线程组。
- 为什么先后两次线程会不一致?
在下面的
5部分CoroutineDispatcher我们会有介绍,IO调度器,它里面对应的是一个线程池。所以先后两次线程名字不一样。
但它们属于同一线程池
**也属于同一个调度器DefaultDispatcher**
带来了一个问题,为什么在一个协程中,先后两次线程的名字不同了呢?
肯定是在哪里切换了线程,才会导致线程的名称不同。
看代码中,我们知道:
22222 线程 是和22222 线程结束是在同一个launch(IO){}协程内的;- 由于
delay()是个suspend挂起函数,根据上面的4.4中的描述,协程在「挂起函数」运行完成后,自动帮我们切回原线程,但打印的结果表示其实在了另外一个线程中。所以更准确得说法是:
- 协程在「挂起函数」运行结束后,会自动切回原来的调度器中。
然后调度器可能会根据它对应的线程池,去选择可用的线程继续工作。
这里需要涉及到 CoroutineDispatcher 以及 ContinuationInterceptor,这里不做过多介绍「内容实在太多了……懒~」。
记住一点就行:所有协程启动时「挂起后,再次运行也为启动」,都会有一次 Continuation.resumeWith() 的操作,这时调度器会重新调度一次,协程的运行可能会从线程池中的 A 线程切换到 B 这个线程上。
这也是上述 log 信息出现的线程名字不同的原因。
Continuation 的源码如下:
/**
 * Interface representing a continuation after a suspension point that returns a value of type `T`.
 */
SinceKotlin("1.3")
public interface Continuation {
    /**
     * The context of the coroutine that corresponds to this continuation.
     */
    public val context: CoroutineContext

    /**
     * Resumes the execution of the corresponding coroutine passing a successful or failed [result] as the
     * return value of the last suspension point.
     */
    public fun resumeWith(result: Result)
}
在有一个 suspend 挂起点后,它会代表着一个协程,协程会存在 T 中,通过 resumeWith(result: Result) 会重新得到这个协程实例。
4.6 suspend 小结
上面,我们使用了大量的代码和逻辑图,用于表示 suspend 在实际运行中起到的作用。
suspend会使得当前代码的运行在该函数处「挂起「协程内挂起」」。suspend的挂起,并不会影响主线程的代码执行,挂起的范围也是我们上面提到的CoroutineScope这个范围内。suspend挂起函数具有在该函数运行结束后,再次切回原线程的能力。当然,这是协程内部帮我们完成的。- 更准确的说法是:协程会在挂起函数运行结束后,自动切回原调度器的能力。
那么「调度器」 是指什么呢?下面简单说一下。
5. CoroutineDispatcher 协程中的调度器
首先它继承于 AbstractCoroutineContextElement, 并实现了 ContinuationInterceptor 接口。
它是 CoroutineContext 的一个子类。
上面的代码分析中,我们使用的 launch(), async(), 有时我们传递了一个参数「Main, IO」,其实就是 CoroutineDispatcher 。
在上面中,我们已经见到了 Main IO 两个调度器。
ContinuationInterceptor是协程拦截器, 在这里暂时不讨论它。
5.1 CoroutineDispatcher 的种类
CoroutineDispatcher 的种类,都在 Dispatchers 类里面,在 Android 中有一下四类:
Default: CoroutineDispatcher = createDefaultDispatcher()默认的调度器, 在
Android中对应的为「线程池」。
在新建的协程中,如果没有指定dispatcher和ContinuationInterceptor则默认会使用该dispatcher。
线程池中会有多个线程。Main: MainCoroutineDispatcher get() = MainDispatcherLoader.dispatcher在主线程「
UI线程」中的调度器。
只在主线程中, 单个线程。Unconfined: CoroutineDispatcher = kotlinx.coroutines.Unconfined
IO: CoroutineDispatcher = DefaultScheduler.IO在
IO线程的调度器,里面的执行逻辑会运行在IO线程, 一般用于耗时的操作。
对应的是「线程池」,会有多个线程在里面。IO和Default共享了线程。
6. 说一说协程里面常见的类
在文章的开头,有一张图,里面有一些在协程中涉及到的类,现在再来看一下。
是不是比刚在文章的开头看上去要亲和很多?
如果是,那么恭喜你,说明大部分内容你都看到了,并且记在了心里,这么长且枯燥的内容,很看到这里都很不容易。赞的赞的
6.1 CoroutineContext
CoroutineContext 和我们经常在代码中使用到的 Context 差别是很大的,它们两没有任何关系。
CoroutineContext 是各种不同元素的集合。
源码如下:
/**
 * Persistent context for the coroutine. It is an indexed set of [Element] instances.
 * An indexed set is a mix between a set and a map.
 * Every element in this set has a unique [Key].
 */
SinceKotlin("1.3")
public interface CoroutineContext {
    ...
    public operator fun  get(key: Key): E?
    ...
    /**
     * Key for the elements of [CoroutineContext]. [E] is a type of element with this key.
     */
    public interface Key
    /**
     * An element of the [CoroutineContext]. An element of the coroutine context is a singleton context by itself.
     */
    public interface Element : CoroutineContext {
        ...
    }
}
它的继承关系是怎样的呢?
什么是 Element? 什么是 Key?
Element是一个接口,实现了CoroutineContext,
代表着:CoroutineContext的一个元素,且为一个单例。- 而
Key是以Element作为 key 的接口。
从 CoroutineContext 需要根据 Key 获取到它对应的 Element
例如:
// 获取当前协程的 job
val job = coroutineContext[Job]
val continuationInterceptor = coroutineContext[ContinuationInterceptor]
如果你翻一翻源码就会发现,在 Job 和 ContinuationInterceptor 中,必定会实现 CoroutineContext.Element 接口,并且具有一个「伴生对象」 companion object Key : CoroutineContext.Key。
Job 是 CoroutineContext 中最为重要的元素,代表着协程的运行状态等信息
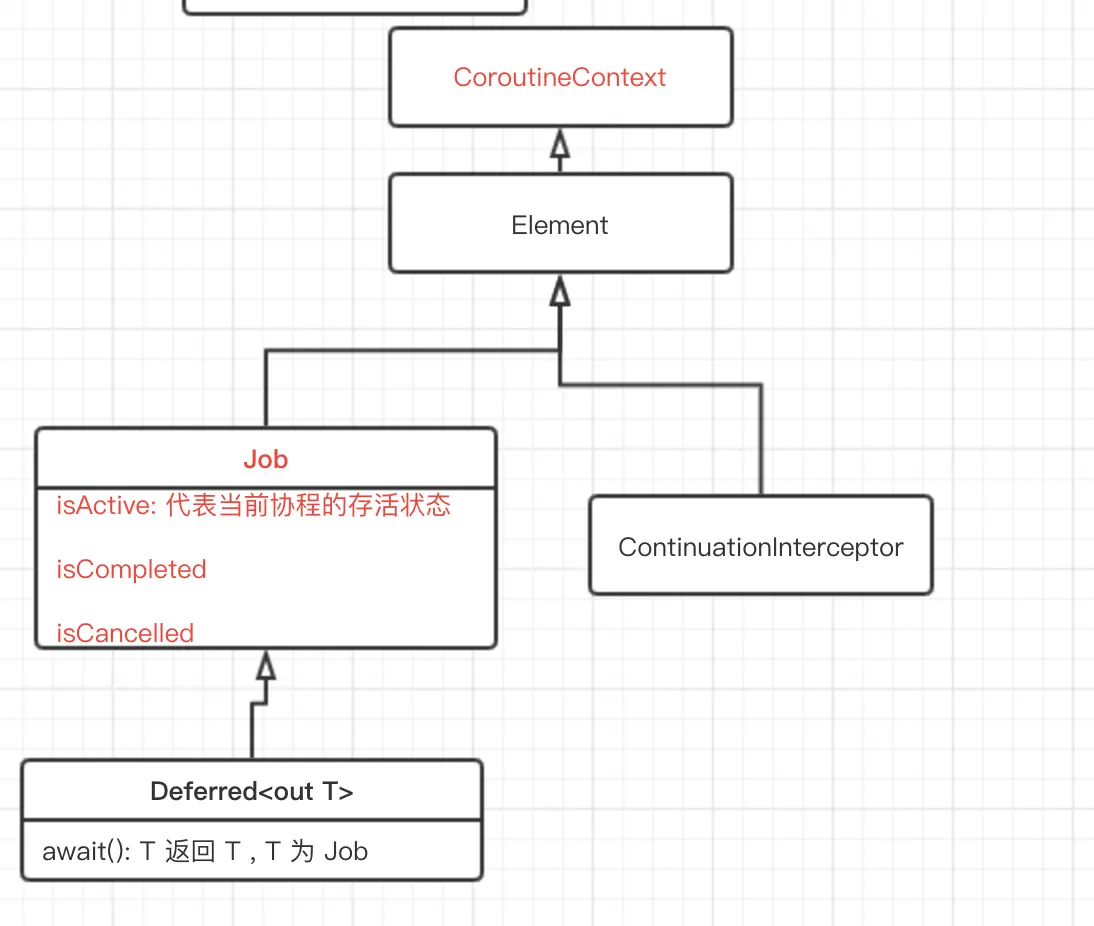
6.2 Coroutine 和 Continuation
Coroutine 就是我们说的「协程」, CoroutineScope.launch() 是会创建一个 Coroutine 的实例。
Continuation 是延续的意思,当一个协程被创建时,就会有一个 Continuation 对应着该协程,它也可代表着协程的状态。
用下面的图表示协程的继承关系:
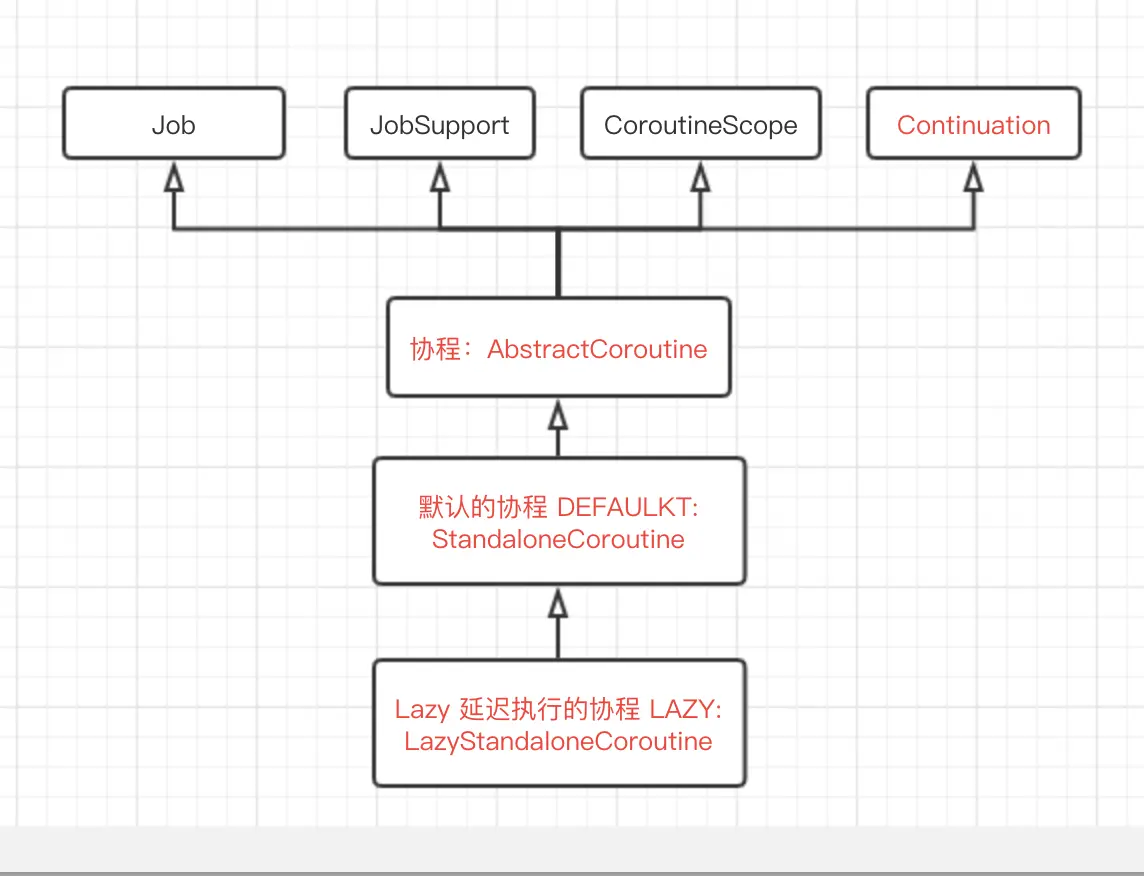
我们可以发现 Coroutine 继承和实现了大量的接口,有 Job,Continuation, CoroutineScope
目前创建的协程,如果不特别指定,都是 StandaloneCoroutine 的实例,会立马执行。
当挂起后,需要重新执行协程时,会调用 Continuation.resume() 再次得到该协程实例,然后开始调度运行。
7. 总结
一定要先说一句,一家之言,很多理解可能并不准确,有错误还请指正。
协程库里面的元素太多了,上面我只是从使用的 API 接口入口,逐步介绍了涉及到的一些知识。
但协程里面的实现原理,调度器,切换原调度器的操作等原理,都未进行深入说明。
协程内容太多了,想到这里,已经比我刚开始想的要多很多很多。
目前写到的内容,也只是浅尝辄止。
但我真心希望,这篇花费了大量时间去写的文章,能解决一些对协程的困惑,能对看到这篇文章的人起到帮助。
希望能尽快用起来协程,真正使用起来,就能明显感受到它给代码带来的精简和便利。
参考文档:
朱凯-协程
medium – easy coroutines
http://talentprince.github.io/2019/02/12/Deep-explore-kotlin-coroutines/
1、本站所有资源均从互联网上收集整理而来,仅供学习交流之用,因此不包含技术服务请大家谅解!
2、本站不提供任何实质性的付费和支付资源,所有需要积分下载的资源均为网站运营赞助费用或者线下劳务费用!
3、本站所有资源仅用于学习及研究使用,您必须在下载后的24小时内删除所下载资源,切勿用于商业用途,否则由此引发的法律纠纷及连带责任本站和发布者概不承担!
4、本站站内提供的所有可下载资源,本站保证未做任何负面改动(不包含修复bug和完善功能等正面优化或二次开发),但本站不保证资源的准确性、安全性和完整性,用户下载后自行斟酌,我们以交流学习为目的,并不是所有的源码都100%无错或无bug!如有链接无法下载、失效或广告,请联系客服处理!
5、本站资源除标明原创外均来自网络整理,版权归原作者或本站特约原创作者所有,如侵犯到您的合法权益,请立即告知本站,本站将及时予与删除并致以最深的歉意!
6、如果您也有好的资源或教程,您可以投稿发布,成功分享后有站币奖励和额外收入!
7、如果您喜欢该资源,请支持官方正版资源,以得到更好的正版服务!
8、请您认真阅读上述内容,注册本站用户或下载本站资源即您同意上述内容!
原文链接:https://www.dandroid.cn/21449,转载请注明出处。


评论0