Android中的Watchdog
- 在Android中,Watchdog是用来监测关键服务是否发生了死锁,如果发生了死锁就kill进程,重启SystemServer
- Android的Watchdog是在SystemServer中进行初始化的,所以Watchdog是运行在SystemServer进程中
- Watchdog是运行一个单独的线程中的,每次wait 30s之后就会发起一个监测行为,如果系统休眠了,那Watchdog的wait行为也会休眠,此时需要等待系统唤醒之后才会重新恢复监测
- 想要被Watchdog监测的对象需要实现Watchdog.Monitor接口的monitor()方法,然后调用addMonitor()方法
- 其实framework里面的Watchdog实现除了能监控线程死锁以外还能够监控线程卡顿,addMonitor()方法是监控线程死锁的,而addThread()方法是监控线程卡顿的
Watchdog线程死锁监控实现
- Watchdog监控线程死锁需要被监控的对象实现Watchdog.Monitor接口的monitor()方法,然后再调用addMonitor()方法,例如ActivityManagerService:
public final class ActivityManagerService extends ActivityManagerNative
        implements Watchdog.Monitor, BatteryStatsImpl.BatteryCallback {

  public ActivityManagerService(Context systemContext) {
    Watchdog.getInstance().addMonitor(this);
  }

  public void monitor() {
        synchronized (this) { }
    }
// ...
}
如上是从ActivityManagerService提取出来关于Watchdog监控ActivityManagerService这个对象锁的相关代码,而监控的实现如下,Watchdog是一个线程对象,start这个线程之后就会每次wait 30s后检查一次,如此不断的循环检查:
public void addMonitor(Monitor monitor) {
        synchronized (this) {
            if (isAlive()) {
                throw new RuntimeException("Monitors can't be added once the Watchdog is running");
            }
            mMonitorChecker.addMonitor(monitor);
        }
    }

@Override
    public void run() {
        boolean waitedHalf = false;
        while (true) {
            final ArrayList blockedCheckers;
            final String subject;
            final boolean allowRestart;
            int debuggerWasConnected = 0;
            synchronized (this) {
                long timeout = CHECK_INTERVAL;
                // Make sure we (re)spin the checkers that have become idle within
                // this wait-and-check interval
                for (int i=0; i 0) {
                    debuggerWasConnected--;
                }

                // NOTE: We use uptimeMillis() here because we do not want to increment the time we
                // wait while asleep. If the device is asleep then the thing that we are waiting
                // to timeout on is asleep as well and won't have a chance to run, causing a false
                // positive on when to kill things.
                long start = SystemClock.uptimeMillis();
                while (timeout > 0) {
                    if (Debug.isDebuggerConnected()) {
                        debuggerWasConnected = 2;
                    }
                    try {
                        wait(timeout);
                    } catch (InterruptedException e) {
                        Log.wtf(TAG, e);
                    }
                    if (Debug.isDebuggerConnected()) {
                        debuggerWasConnected = 2;
                    }
                    timeout = CHECK_INTERVAL - (SystemClock.uptimeMillis() - start);
                }

                final int waitState = evaluateCheckerCompletionLocked();
                if (waitState == COMPLETED) {
                    // The monitors have returned; reset
                    waitedHalf = false;
                    continue;
                } else if (waitState == WAITING) {
                    // still waiting but within their configured intervals; back off and recheck
                    continue;
                } else if (waitState == WAITED_HALF) {
                    if (!waitedHalf) {
                        // We've waited half the deadlock-detection interval.  Pull a stack
                        // trace and wait another half.
                        ArrayList pids = new ArrayList();
                        pids.add(Process.myPid());
                        ActivityManagerService.dumpStackTraces(true, pids, null, null,
                                NATIVE_STACKS_OF_INTEREST);
                        waitedHalf = true;
                    }
                    continue;
                }

                // something is overdue!
                blockedCheckers = getBlockedCheckersLocked();
                subject = describeCheckersLocked(blockedCheckers);
                allowRestart = mAllowRestart;
            }

            // If we got here, that means that the system is most likely hung.
            // First collect stack traces from all threads of the system process.
            // Then kill this process so that the system will restart.
            EventLog.writeEvent(EventLogTags.WATCHDOG, subject);

            ArrayList pids = new ArrayList();
            pids.add(Process.myPid());
            if (mPhonePid > 0) pids.add(mPhonePid);
            // Pass !waitedHalf so that just in case we somehow wind up here without having
            // dumped the halfway stacks, we properly re-initialize the trace file.
            final File stack = ActivityManagerService.dumpStackTraces(
                    !waitedHalf, pids, null, null, NATIVE_STACKS_OF_INTEREST);

            // Give some extra time to make sure the stack traces get written.
            // The system's been hanging for a minute, another second or two won't hurt much.
            SystemClock.sleep(2000);

            // Pull our own kernel thread stacks as well if we're configured for that
            if (RECORD_KERNEL_THREADS) {
                dumpKernelStackTraces();
            }

            String tracesPath = SystemProperties.get("dalvik.vm.stack-trace-file", null);
            String traceFileNameAmendment = "_SystemServer_WDT" + mTraceDateFormat.format(new Date());

            if (tracesPath != null && tracesPath.length() != 0) {
                File traceRenameFile = new File(tracesPath);
                String newTracesPath;
                int lpos = tracesPath.lastIndexOf (".");
                if (-1 != lpos)
                    newTracesPath = tracesPath.substring (0, lpos) + traceFileNameAmendment + tracesPath.substring (lpos);
                else
                    newTracesPath = tracesPath + traceFileNameAmendment;
                traceRenameFile.renameTo(new File(newTracesPath));
                tracesPath = newTracesPath;
            }

            final File newFd = new File(tracesPath);

            // Try to add the error to the dropbox, but assuming that the ActivityManager
            // itself may be deadlocked.  (which has happened, causing this statement to
            // deadlock and the watchdog as a whole to be ineffective)
            Thread dropboxThread = new Thread("watchdogWriteToDropbox") {
                    public void run() {
                        mActivity.addErrorToDropBox(
                                "watchdog", null, "system_server", null, null,
                                subject, null, newFd, null);
                    }
                };
            dropboxThread.start();
            try {
                dropboxThread.join(2000);  // wait up to 2 seconds for it to return.
            } catch (InterruptedException ignored) {}


            // At times, when user space watchdog traces don't give an indication on
            // which component held a lock, because of which other threads are blocked,
            // (thereby causing Watchdog), crash the device to analyze RAM dumps
            boolean crashOnWatchdog = SystemProperties
                                        .getBoolean("persist.sys.crashOnWatchdog", false);
            if (crashOnWatchdog) {
                // Trigger the kernel to dump all blocked threads, and backtraces
                // on all CPUs to the kernel log
                Slog.e(TAG, "Triggering SysRq for system_server watchdog");
                doSysRq('w');
                doSysRq('l');

                // wait until the above blocked threads be dumped into kernel log
                SystemClock.sleep(3000);

                // now try to crash the target
                doSysRq('c');
            }

            IActivityController controller;
            synchronized (this) {
                controller = mController;
            }
            if (controller != null) {
                Slog.i(TAG, "Reporting stuck state to activity controller");
                try {
                    Binder.setDumpDisabled("Service dumps disabled due to hung system process.");
                    // 1 = keep waiting, -1 = kill system
                    int res = controller.systemNotResponding(subject);
                    if (res >= 0) {
                        Slog.i(TAG, "Activity controller requested to coninue to wait");
                        waitedHalf = false;
                        continue;
                    }
                } catch (RemoteException e) {
                }
            }

            // Only kill the process if the debugger is not attached.
            if (Debug.isDebuggerConnected()) {
                debuggerWasConnected = 2;
            }
            if (debuggerWasConnected >= 2) {
                Slog.w(TAG, "Debugger connected: Watchdog is *not* killing the system process");
            } else if (debuggerWasConnected > 0) {
                Slog.w(TAG, "Debugger was connected: Watchdog is *not* killing the system process");
            } else if (!allowRestart) {
                Slog.w(TAG, "Restart not allowed: Watchdog is *not* killing the system process");
            } else {
                Slog.w(TAG, "*** WATCHDOG KILLING SYSTEM PROCESS: " + subject);
                for (int i=0; i
首先,ActivityManagerService调用addMonitor()方法把自己添加到了Watchdog的mMonitorChecker对象中,这是Watchdog的一个全局变量,这个全部变量在Watchdog的构造方法中已经事先初始化好并添加到mHandlerCheckers:ArrayList这个监控对象列表中了,mMonitorChecker是一个HandlerChecker类的实例对象,代码如下:
public final class HandlerChecker implements Runnable {
        private final Handler mHandler;
        private final String mName;
        private final long mWaitMax;
        private final ArrayList mMonitors = new ArrayList();
        private boolean mCompleted;
        private Monitor mCurrentMonitor;
        private long mStartTime;

        HandlerChecker(Handler handler, String name, long waitMaxMillis) {
            mHandler = handler;
            mName = name;
            mWaitMax = waitMaxMillis;
            mCompleted = true;
        }

        public void addMonitor(Monitor monitor) {
            mMonitors.add(monitor);
        }

        public void scheduleCheckLocked() {
            if (mMonitors.size() == 0 && mHandler.getLooper().getQueue().isPolling()) {
                // If the target looper has recently been polling, then
                // there is no reason to enqueue our checker on it since that
                // is as good as it not being deadlocked.  This avoid having
                // to do a context switch to check the thread.  Note that we
                // only do this if mCheckReboot is false and we have no
                // monitors, since those would need to be executed at this point.
                mCompleted = true;
                return;
            }

            if (!mCompleted) {
                // we already have a check in flight, so no need
                return;
            }

            mCompleted = false;
            mCurrentMonitor = null;
            mStartTime = SystemClock.uptimeMillis();
            mHandler.postAtFrontOfQueue(this);
        }

        public boolean isOverdueLocked() {
            return (!mCompleted) && (SystemClock.uptimeMillis() > mStartTime + mWaitMax);
        }

        public int getCompletionStateLocked() {
            if (mCompleted) {
                return COMPLETED;
            } else {
                long latency = SystemClock.uptimeMillis() - mStartTime;
                if (latency < mWaitMax/2) {
                    return WAITING;
                } else if (latency < mWaitMax) {
                    return WAITED_HALF;
                }
            }
            return OVERDUE;
        }

        public Thread getThread() {
            return mHandler.getLooper().getThread();
        }

        public String getName() {
            return mName;
        }

        public String describeBlockedStateLocked() {
            if (mCurrentMonitor == null) {
                return "Blocked in handler on " + mName + " (" + getThread().getName() + ")";
            } else {
                return "Blocked in monitor " + mCurrentMonitor.getClass().getName()
                        + " on " + mName + " (" + getThread().getName() + ")";
            }
        }

        @Override
        public void run() {
            final int size = mMonitors.size();
            for (int i = 0 ; i < size ; i++) {
                synchronized (Watchdog.this) {
                    mCurrentMonitor = mMonitors.get(i);
                }
                mCurrentMonitor.monitor();
            }

            synchronized (Watchdog.this) {
                mCompleted = true;
                mCurrentMonitor = null;
            }
        }
    }
HandlerChecker类中的mMonitors也是监控对象列表,这里是监控所有实现了Watchdog.Monitor接口的监控对象,而那些没有实现Watchdog.Monitor接口的对象则会单独创建一个HandlerChecker类并add到Watchdog的mHandlerCheckers监控列表中,当Watchdog线程开始健康那个的时候就回去遍历mHandlerCheckers列表,并逐一的调用HandlerChecker的scheduleCheckLocked方法:
public void scheduleCheckLocked() {
            if (mMonitors.size() == 0 && mHandler.getLooper().getQueue().isPolling()) {
                // If the target looper has recently been polling, then
                // there is no reason to enqueue our checker on it since that
                // is as good as it not being deadlocked.  This avoid having
                // to do a context switch to check the thread.  Note that we
                // only do this if mCheckReboot is false and we have no
                // monitors, since those would need to be executed at this point.
                mCompleted = true;
                return;
            }

            if (!mCompleted) {
                // we already have a check in flight, so no need
                return;
            }

            mCompleted = false;
            mCurrentMonitor = null;
            mStartTime = SystemClock.uptimeMillis();
            mHandler.postAtFrontOfQueue(this);
        }
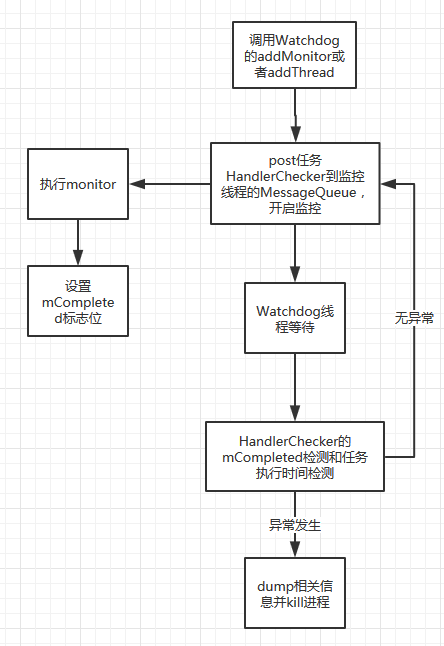
HandlerChecker这个类中有几个比较重要的标志,一个是mCompleted,标识着本次监控扫描是否在指定时间内完成,mStartTime标识本次开始扫描的时间mHandler,则是被监控的线程的handler,scheduleCheckLocked是开启本次对与改线程的监控,里面理所当然的会把mCompleted置为false并设置开始时间,可以看到,监控原理就是向被监控的线程的Handler的消息队列中post一个任务,也就是HandlerChecker本身,然后HandlerChecker这个任务就会在被监控的线程对应Handler维护的消息队列中被执行,如果消息队列因为某一个任务卡住,那么HandlerChecker这个任务就无法及时的执行到,超过了指定的时间后就会被认为当前被监控的这个线程发生了卡死(死锁造成的卡死或者执行耗时任务造成的卡死),在HandlerChecker这个任务中:
@Override
        public void run() {
            final int size = mMonitors.size();
            for (int i = 0 ; i < size ; i++) {
                synchronized (Watchdog.this) {
                    mCurrentMonitor = mMonitors.get(i);
                }
                mCurrentMonitor.monitor();
            }

            synchronized (Watchdog.this) {
                mCompleted = true;
                mCurrentMonitor = null;
            }
        }
首先遍历mMonitors列表中的监控对象并调用monitor()方法来开启监控,通常在被监控对象实现的monitor()方法都是按照如下实现的:
public void monitor() {
        synchronized (this) { }
    }
即监控某一个死锁,然后就是本次监控完成,mCompleted设置为true,而当所有的scheduleCheckLocked都执行完了之后,Watchdog就开始wait,而且一定要wait for 30s,这里有一个实现细节:
long start = SystemClock.uptimeMillis();
                while (timeout > 0) {
                    if (Debug.isDebuggerConnected()) {
                        debuggerWasConnected = 2;
                    }
                    try {
                        wait(timeout);
                    } catch (InterruptedException e) {
                        Log.wtf(TAG, e);
                    }
                    if (Debug.isDebuggerConnected()) {
                        debuggerWasConnected = 2;
                    }
                    timeout = CHECK_INTERVAL - (SystemClock.uptimeMillis() - start);
                }
原先,我看到这段代码的时候,首先关注到SystemClock.uptimeMillis()在设备休眠的时候是不计时的,因此猜测会不会是因为设备休眠了,wait也停止了,Watchdog在wait到15s的时候设备休眠了,并且连续休眠30分钟后才又被唤醒,那么这时候wait会不会马上被唤醒,答案是:正常情况下wait会继续,知道直到剩下的15s也wait完成后才会唤醒,所以我疑惑了,于是查看下下Thread的wait()方法的接口文档,终于找到如下解释:
A thread can also wake up without being notified, interrupted, or
     * timing out, a so-called spurious wakeup.  While this will rarely
     * occur in practice, applications must guard against it by testing for
     * the condition that should have caused the thread to be awakened, and
     * continuing to wait if the condition is not satisfied.  In other words,
     * waits should always occur in loops, like this one:
     *
* synchronized (obj) {
* while (<condition does not hold>)
* obj.wait(timeout);
* ... // Perform action appropriate to condition
* }
*
大致意思是说当Thread在wait的时候除了会被主动唤醒(notify或者notifyAll),中断(interrupt),或者wait的时间到期而唤醒,还有可能被假唤醒,而这种假唤醒在实践中发生的几率非常低,不过针对这种假唤醒,程序需要通过验证唤醒条件来区分线程是真的唤醒还是假的唤醒,如果是假的唤醒那么就继续wait直到真唤醒,事实上,在我们实际的开发过程中确实要注意这种微小的细节,可能99%的情况下不会发生,但是要是遇到1%的情况发生之后,那么这个问题将会是非常隐晦的,而且在查找问题的时候也会变得很困难,很奇怪,为什么线程好好的wait过程中突然被唤醒了呢,甚至可能怀疑我们以前对于线程wait在设备休眠状态下的执行情况?,废话就扯到这里,继续来研究Watchdog机制,在Watchdog等待30s之后会调用evaluateCheckerCompletionLocked()方法来检测被监控对象的运行情况:
private int evaluateCheckerCompletionLocked() {
        int state = COMPLETED;
        for (int i=0; i
通过调用HandlerChecker的getCompletionStateLocked来获取每一个HandlerChecker的监控状态:
public int getCompletionStateLocked() {
            if (mCompleted) {
                return COMPLETED;
            } else {
                long latency = SystemClock.uptimeMillis() - mStartTime;
                if (latency < mWaitMax/2) {
                    return WAITING;
                } else if (latency < mWaitMax) {
                    return WAITED_HALF;
                }
            }
            return OVERDUE;
        }
从这里,我们就看到了其实是通过mCompleted这个标志来区分30s之前和30s之后的不通状态,因为30s之前对被监控的线程对应的Handler的消息对了中post了一个HandlerChecker任务,然后mCompleted = false,等待了30s后,如果HandlerChecker被及时的执行了,那么mCompleted = true表示任务及时执行完毕,而如果发现mCompleted = false那就说明HandlerChecker依然未被执行,当mCompleted = false的时候,会继续检测HandlerChecker任务的执行时间,如果在唤醒状态下的执行时间小于30秒,那重新post监控等待,如果在30秒到60秒之间,那就会dump出一些堆栈信息,然后重新post监控等待,当等待时间已经超过60秒了,那就认为这是异常情况了(要么死锁,要么耗时任务太久),这时候就会搜集各种相关信息,例如代码堆栈信息,kernel信息,cpu信息等,生成trace文件,保存相关信息到dropbox文件夹下,然后杀死该进程,到这里监控就结束了
Watchdog线程卡顿监控实现
之前我们提到Watchdog监控的实现是通过post一个HandlerChecker到线程对应的Handler对的消息对了中的,而死锁的监控对象都是保存在HandlerChecker的mMonitors列表中的,所以外部调用addMonitor()方法,最终都会add到Watchdog的全局变量mMonitorChecker中的监控列表,一次所有线程的死锁监控都由mMonitorChecker来负责实现,那么对于线程耗时任务的监控,Watchdog是通过addThread()方法来实现的:
public void addThread(Handler thread) {
        addThread(thread, DEFAULT_TIMEOUT);
    }

    public void addThread(Handler thread, long timeoutMillis) {
        synchronized (this) {
            if (isAlive()) {
                throw new RuntimeException("Threads can't be added once the Watchdog is running");
            }
            final String name = thread.getLooper().getThread().getName();
            mHandlerCheckers.add(new HandlerChecker(thread, name, timeoutMillis));
        }
    }
addThread()方法实际上是创建了一个新的HandlerChecker对象,通过该对象来实现耗时任务的监控,而该HandlerChecker对象的mMonitors列表实际上是空的,因此在执行任务的时候并不会执行monitor()方法了,而是直接设置mCompleted标志位,所以可以这么解释:Watchdog监控者是HandlerChecker,而HandlerChecker实现了线程死锁监控和耗时任务监控,当有Monitor对象的时候就会同时监控线程死锁和耗时任务,而没有Monitor的时候就只是监控线程的耗时任务造成的卡顿
Watchdog监控流程

watchdog.jpg
- 理解了Watchdog的监控流程,我们可以考虑是否把Watchdog机制运用到我们实际的项目中去实现监控在多线程场景中重要线程的死锁,以及实时监控主线程的anr的发生?当然是可以的,事实上,Watchdog的在framework中的重要作用就是监控主要的系统服务器是否发生死锁或者发生卡顿,例如监控ActivityManagerService,如果发生异常情况,那么Watchdog将会杀死进程重启,这样可以保证重要的系统服务遇到类似问题的时候可以通过重启来恢复,Watchdog实际上相当于一个最后的保障,及时的dump出异常信息,异常恢复进程运行环境
- 对于应用程序中,健康那个重要线程的死锁问题实现原理可以和Watchdog保持一致
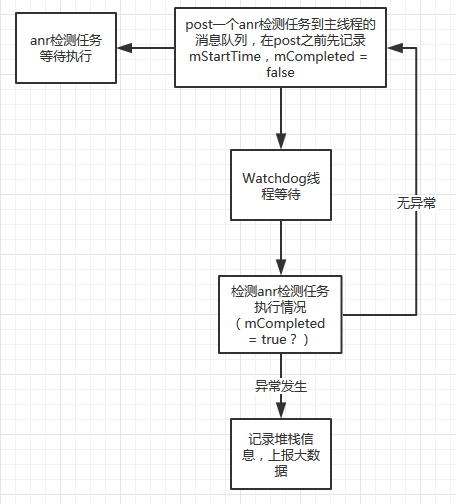
- 对于监控应用的anr卡顿的实现原理可以从Watchdog中借鉴,具体实现稍微有点不一样,Activity是5秒发生anr,Broadcast是10秒,Service是20秒,但是实际四大组件都是运行在主线程中的,所以可以用像Watchdog一样,wait 30秒发起一次监控,通过设置mCompleted标志位来检测post到MessageQueue的任务是否被卡住并未及时的执行,通过mStartTime来计算出任务的执行时间,然后通过任务执行的时间来检测MessageQueue中其他的任务执行是否存在耗时操作,如果发现执行时间超过5秒,那么可以说明消息队列中存在耗时任务,这时候可能就有anr的风险,应该及时dump线程栈信息保存,然后通过大数据上报后台分析,记住这里一定是计算设备活跃的状态下的时间,如果是设备休眠,MessageQueue本来就会暂停运行,这时候其实并不是死锁或者卡顿

WatchDog机制的anr在线监控实现与demo
https://github.com/liuhongda/anrmonitor/tree/master/anrmonitor
Watchdog机制总结
- 每一个线程都可以对应一个Looper,一个Looper对应一个MessageQueue,所以可以通过向MessageQueue中post检测任务来预测该检测任务是否被及时的执行,以此达到检测线程任务卡顿的效果,但是前提是该线程要先创建一个Looper
- Watchdog必须独自运行在一个单独的线程中,这样才可以监控其他线程而不互相影响
- 使用Watchdog机制来实现在线的anr监控可能并不能百分百准确,比如5秒发生anr,在快到5秒的临界值的时候耗时任务正好执行完成了,这时候执行anr检测任务,在检测任务执行过程中,有可能Watchdog线程wait的时间也到了,这时候发现检测任务还没执行完于是就报了一个anr,这是不准确的;另一种情况可能是5秒anr已经发生了,但是Watchdog线程检测还没还是wait,也就是anr发生的时间和Watchdog线程wait的时间错开了,等到下一次Watchdog线程开始wait的时候,anr已经发生完了,主线程可能已经恢复正常,这时候就会漏掉这次发生的anr信息搜集,所以当anr卡顿的时间是Watchdog线程wait时间的两倍的时候,才能完整的扫描到anr并记录,也就是说Watchdog的wait时间为2.5秒,这个在实际应用中有点过于频繁了,如果设备不休眠,Watchdog相当于每间隔2.5秒就会运行一下,可能会有耗电风险
文章来源于互联网:Android ANR在线监控原理
1、本站所有资源均从互联网上收集整理而来,仅供学习交流之用,因此不包含技术服务请大家谅解!
2、本站不提供任何实质性的付费和支付资源,所有需要积分下载的资源均为网站运营赞助费用或者线下劳务费用!
3、本站所有资源仅用于学习及研究使用,您必须在下载后的24小时内删除所下载资源,切勿用于商业用途,否则由此引发的法律纠纷及连带责任本站和发布者概不承担!
4、本站站内提供的所有可下载资源,本站保证未做任何负面改动(不包含修复bug和完善功能等正面优化或二次开发),但本站不保证资源的准确性、安全性和完整性,用户下载后自行斟酌,我们以交流学习为目的,并不是所有的源码都100%无错或无bug!如有链接无法下载、失效或广告,请联系客服处理!
5、本站资源除标明原创外均来自网络整理,版权归原作者或本站特约原创作者所有,如侵犯到您的合法权益,请立即告知本站,本站将及时予与删除并致以最深的歉意!
6、如果您也有好的资源或教程,您可以投稿发布,成功分享后有站币奖励和额外收入!
7、如果您喜欢该资源,请支持官方正版资源,以得到更好的正版服务!
8、请您认真阅读上述内容,注册本站用户或下载本站资源即您同意上述内容!
原文链接:https://www.dandroid.cn/21857,转载请注明出处。


评论0